The EasyPost® Mailroom can be installed in a "stand-alone" configuration or to work with the EasyPost® Spooler. This document describes quick installation, configuration and testing of the "stand-alone" Mailroom version. To install and configure the EasyPost® Mailroom that operates with EasyPost® Spooler please consult the Spooler Installation Guide for detailed instructions.
Installation
Before you start:
You will need your Customer ID and Password as supplied by your Bing representative (Note: the Customer ID and Password are case sensitive)
System requirements vary greatly between the operating systems. Please refer to the minimum system requirements for your operating system. The minimum system requirements for your operating system should be enough to run the EasyPost Mailroom software without issue. We do however recommend the following specification for an improved user experience:
- Operating system: MS Windows
- Processor: 1 GHz or faster
- Memory: 2GB RAM
- Hard Disk Space: 50MB for software installation and 10 GB for database
- Broadband Internet Connection
Note: Performance is limited by the available system resources.
If you do not normally install software on your computer you may need to consult your systems administrator for assistance.
STEP 1: Install the EasyPost Mailroom
Install the Mailroom relevant to your operating system (see Installation instructions for detail). Proceed through the wizard with the default settings unless advised otherwise by Bing Customer Service.
STEP 2: Create a simple letter
Create a letter with a valid address using Microsoft Word or Notepad or any other MS Windows application. The minimum requirement is to have an address of at least two lines, with no paragraph spacing. Address position, validity, and other document content is not relevant.
STEP 3: Print your letter to the Mailroom printer
Print the letter to the Mailroom printer that has now been installed on your computer
STEP 4: Send the letter (including once only registration)
The Mailroom Wizard - Welcome screen appears, complete the following:
- On the Wizard - Welcome screen, click Next.
- The Wizard – Address Capture screen appears, select the address and click Next. Enter your email address in the Email field at the top of the screen.
- The Mailroom screen appears, select Next and the Account Details screen appears. Enter a department name (optional) and a valid email address (for notification of received letters) and click the OK button.
- A message appears indicating the product is not registered, select Yes.
- The Node Registration screen appears, enter your user name or email address, the Customer ID and Password supplied by your Bing representative and click Register.
- You should receive a message indicating registration success, select Ok.
- The Please review details screen appears. Select Submit. Check “Confirmation Email on Receipt” for this test.
- The Thank you screen appears confirming that your letters have been scheduled for upload. Click Ok, and select Close on the Mailroom screen.
If you requested a verification email you should receive it shortly. Alternatively, open the Mailroom from Programs, or your Mailroom desktop shortcut, and click on Completed. Mailing status will show as “Accepted” or “On Hold (pending Customer Service check)”. If your mail shows in the “Outgoing” folder, Use the Refresh button to update its status. This result confirms your connectivity to the Bing webservice.
If the letter you sent was a test, please let Bing Customer Service know so they can cancel it. Alternatively, you can use your Bing Customer Portal login to cancel it yourself.
Sending Letters
- Open your document in its native application For example – MS Word, PDF, etc.
- Print the document to the Mailroom printer.
- The Mailroom Wizard - Welcome screen is displayed.
- Select Preview and Send Letters and click the Next button.

- In the Wizard - Address Capture screen, use your mouse to re-draw the ‘blue box’ outline around the recipient address area
- Click the Next button.

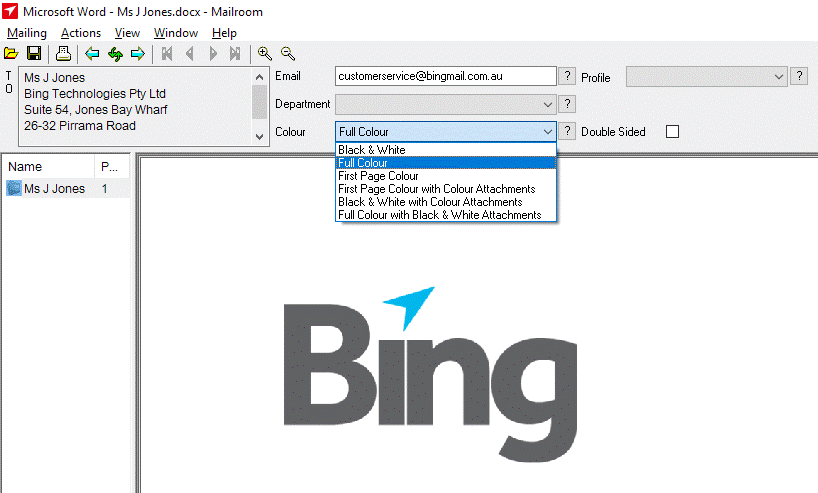
- You will be shown a preview window where you can review your letter(s) and select formatting options including colour and double-sided print settings.
- When you have reviewed your document and selected the options of choice, click the Next button.
- The Please review details… screen displays a summary of options you have selected.
- Please review the details and if necessary make any changes in the Mailroom viewer by clicking “Cancel”, making your changes, and clicking “Next”.
- When you are ready to send letter(s) click the Submit button.

- Upon successful submission of letters, the Thank you… screen will display the bing Mailing Receipt.
- Use the bing Mailing Service Number if you need to contact Customer Service about your mailing.
- Click the OK button to exit and click the Close button to exit the Mailroom.

Saving Letterheads
- Open a letterhead in its native application For example – MS Word, PDF, etc.
- Print the document to the Mailroom printer.
- The Mailroom Wizard - Welcome screen is displayed.
- Select Save as Letterhead and click the Next button.

- Your letterhead will be displayed in a preview window where you can check its layout.
- If you wish to rename your letterhead, select Mailing > Rename then rename it and click OK.
- When satisfied, select Mailing > Save.
- Then exit the Mailroom by clicking on the Close button.

- Your letterhead is now ready for future use in the Mailroom.
- When you print new letter(s), this letterhead will be available using the Add letterhead tick box as shown.
- When you click Next, you will be given an option to select your letterhead.

Saving Attachments
- Open an attachment in its native application For example – MS Word, PDF, etc.
- Print the document to the Mailroom printer.
- The Mailroom Wizard - Welcome screen is displayed.
- Select Save as Attachment and click the Next button.

- Your attachment will be displayed in a preview window where you can check its layout.
- You can select Colour options for your attachment.
- If you wish to rename your attachment, select Mailing > Rename then rename it and click OK.
- When satisfied, select Mailing > Save.
- Then exit the Mailroom by clicking on the Close button.

- Your attachment is now ready in the Mailroom for future use.
- When you print new letter(s), this attachment will be available using the Add attachment tick box as shown.
- When you click Next, you will be given an option to select your attachment.

Service Information
Customer Service contact details:
Phone: 1300 309 800
Email: customerservice@bingmail.com.au
Operating Hours: Monday – Friday 8:00am – 5:00pm AEST
When processing letters you should always treat the ‘Submit’ button as though you were putting your letters in a post box.
In very limited circumstances it may be possible to cancel a pack that has not commenced processing, please contact Bing immediately if you discover you have submitted a pack incorrectly. NB As your letters may be processed shortly after receipt, you must do this as soon as possible. Once letters have begun processing they cannot be cancelled. Please do not email cancellation requests. Deleting a mailing from completed items will not cancel your letter.
For large volume letter processing please contact your Account Manager on 1300 309 800. They will be able to confirm the change of Service Level.
To draw the blue box around your address, take the cursor and click at the top left hand corner of your address. Drag the blue box down to cover three quarters of the box and release. NB The blue box should not be drawn larger than the address as this can cause grouping and separation of letters. It is preferable to have a smaller, rather than a larger capture area.

Checking addresses in the preview screen is a critical process when submitting letters to Bing. There are three different areas available to review to ensure that addresses have correctly separated, and your resulting number of letters and pages are as expected:


- Prices on our price schedules and price estimates do not include GST.
- Please check the colour options you have chosen for your letters before submitting. There is a drop down box at the top right hand corner of your preview screen that allows you to view these settings. These cannot be changed once a mailing has been submitted.
- If you choose the duplex option it applies to all pages, not just a letter or attachment. Please note: Attachments always start on a new page, not on the reverse of the previous page even if it is blank.
- Your Bing mailing ID is the unique identifier for your mailing. It is visible only once the mailing has been submitted (in Completed).
- If the Mailing shows in the “Outgoing” folder, it hasn’t yet reached Bing for processing.
- For small letters, the address is printed on the back of the last page. If there is no blank page then an additional page will be inserted at no extra charge to the customer. Large letters always have an additional page inserted.
We suggest you send yourself a sample letter when you start with the Bing service in order to familiarise yourself with our finished product.