Before Printing
Before printing documents to the EasyPost Mailroom, you should:
1. Review your address formats. Addresses should be formatted according to Australia Post standards.
Typically, addresses should conform to the following guidelines:
- Use clear readable type. Ensure the print characters in the address do not touch or overlap. Use a fixed pitch type font such as Courier 12 point (10 pitch). Avoid italic, artistic, script, extremely wide or narrow print fonts.
- No single line of the address should exceed 64 characters.
- The address should have no more than six (6) lines.
- The top line should contain the recipients name. Some customers include a reference number on the first line and start the recipients address on the second line.
- For domestic mail, the second last line should contain the number and name of the street, or PO Box or locked bag number if applicable. The last line should contain the suburb, place name or post office of delivery, State or Territory abbreviation and postcode. This line should be printed in capitals without punctuation or underlining.
- For overseas mail, the country name should be in capitals on the last line.
- Where extra clarifying information is required, place this information above the last two lines of the address (this includes information such as: reference numbers, company or property name, and other non-address information).
2. Minimize the size of the images included in your documents.
If you have high resolution images or are otherwise using images that are large in size they will make the size of your documents a lot bigger than they need to be. There are two basic methods you may use to reduce the size of images:
- Use the tools built into MS Word, or;
- Use an image/photo editing program of your choice.
The tools built into to MS Word work effectively with a much wider variety of documents.
Printing
The first step in sending mail is to print your document to the EasyPost Mailroom as if it was a printer. So choose the Print function in your Windows application (usually found in the File menu).
Once you have invoked printing, you should see the Windows Print Dialog. If you are in a corporate environment, or on a network you probably have a few printers to choose from. It is in this screen that you can choose Mailroom as your printer.
Here you can also set the printer settings as if you were using a physical printer (e.g. landscape format). For now we will accept the default settings and move on to Lesson 3: Preparing Letters.
Note: If you are printing to the EasyPost Mailroom printer from an application that generates individual documents / print files, you should disable the automatic EasyPost Mailroom pop-up. Choose Properties in the EasyPost Mailroom printer, select Printing Preferences and clear the Open mailroom after print check box. It is recommended that this option also be cleared from the Printing Defaults dialog on the Advanced tab of the Properties page. Note that some applications use the Printing Preferences and others use the Printing Defaults. After all the letters have been printed, the EasyPost Mailroom may be opened manually (from your desktop). All print doocuments will appear in New and may be selected as a group from the Mailing Summary. The selected letters will be consolidated into a single mailing.
Preparing Letters
Preparing a simple letter with the Wizard is a two-step process;
Select a format for your printed document. A document can be a set of letters, an attachment or a letterhead.
For letters, select the location of the recipients address in the document. Click and hold left mouse-button to draw the blue rectangle over the recipient address.
The first screen in the Wizard is the Welcome screen. This screen allows you to choose both the format for your document (e.g. a letter, attachment or letterhead). For this lesson, we will choose a simple letter without attachments. To do this, you can just accept the default settings in the Welcome screen and click Next.
Now that you have chosen the mailings format, you can capture the recipients address from your letter. To do this, you must drag a blue rectangle over the address in the Address Capture Screen.
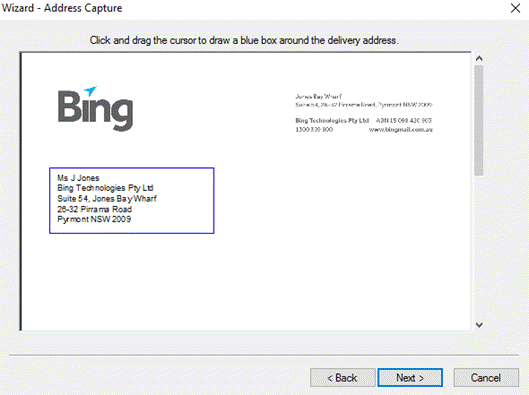
Fig 3.1
Once you have clicked Next, your mailing is analysed and extracted addresses are loaded ready for checking and sending. If you are sending a mail merge document, the printed document will be separated into individual letters and the addresses for each letter will be extracted.
When the analysis of the letters into the mailing is finished you will see the Mailroom Viewer. Now proceed to Lesson 4: Checking Letters.
Checking Letters
The Mailroom Viewer is designed to assist you with checking or validating your letters before submission. The following steps should be completed before you submit your letters:
Check the letter and page counts. The letter count should equal the number of intended recipients and the page count should be consistent with the letter count. For example, if you are sending 100 two page letters, the page count should equal 200.
Check each letter that has a page count longer than expected. To sort the letters by page count click on the column header for the Pages column. Note that sequential letters with the same delivery address may be grouped together unless the No group option was selected (in advanced options).
If letters with different delivery addresses are being grouped together, you may wish to use the Mixed Templates option. This often happens when multiple templates are used to produce a mail-merge document (in advanced options).
Look for any errors in extracted addresses. Common address extraction errors include database errors (incomplete addresses or invalid addresses and addresses that include blank lines). If you have a number of addresses that include blank lines and you cannot change your source application or template, you may wish to use the Ignore Blank Lines feature (in advanced options).
Scroll up or down as needed to visually inspect each page of at least one entire letter. Make sure that all images are being displayed correctly and no elements are missing. We recommend that you check-over all of youre mailing before sending, especially if youre not a confident user.
Make sure that any required letter options have been set correctly (single sided, double sided or colour).
Visually inspect the destination addresses. To minimize delivery delays, addresses should be formatted as follows:
Recipients Name
Street Address or P.O. Box
LOCALITY STATE POSTCODE (No Punctuation required)
COUNTRY (For international mail ONLY)
No individual address line may be longer than 64 characters and there may be no more than six (6) lines in an address. If you wish to include a reference number for each recipient, it should be included in the first line of the address.
The Mailroom Viewer includes several features designed to assist with the validation of destination addresses. When a letter is selected, the destination address is shown as the To Address in the address bar.
If you position the cursor over a specific letter in the letter view for a few seconds, the address for the letter will be shown in a tooltip.
You may also expand the Letter View by dragging the column open to inspect the destination addresses in the letter view (list).
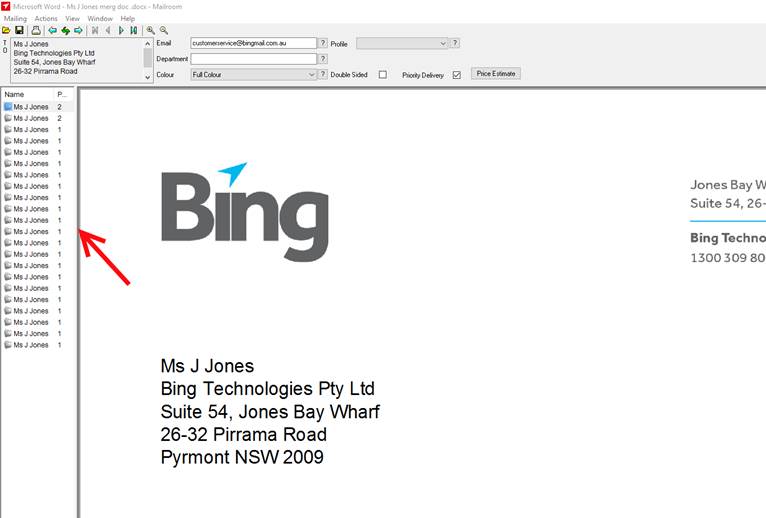
Fig 4.1
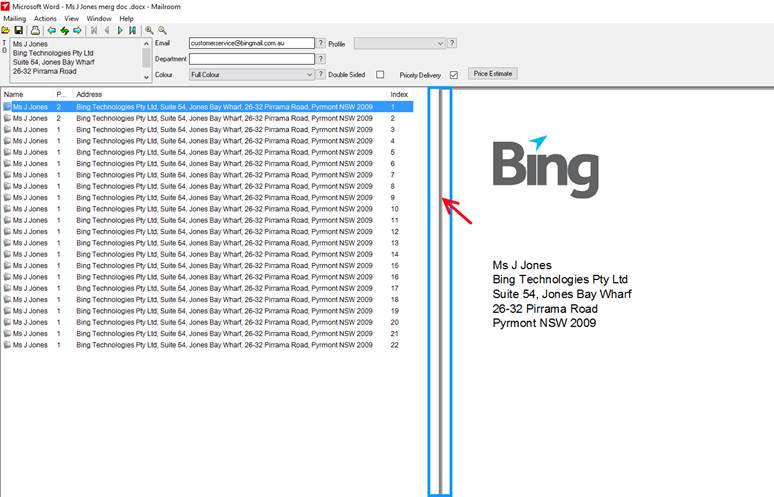
Fig 4.2
Note that the Letter View must be set to Details to see the destination addresses. To change the letter view right-click in the envelope list and select Details. If the letter or page counts do not match your expectations, you can also use the Letter View to search for individual letters with unexpected page counts. The letters may be sorted by page count by clicking on the column header titled Pages.
The most common reasons for letters with unexpected page counts are:
1. Two or more letters were grouped together because they had the same destination address. This behaviour is by design (normal). Use the No group feature in advanced options to send each letter separately.
2. A letter was generated with no address or an incomplete address. Use the Ignore Blank Lines feature in advanced options.
3. A letter was generated with an address line longer than 72 characters.
4. The address selection area was too big. The wrong block of text was selected for the destination address on one or more letters.
Note that the address selection area does not need to contain the entire address for each letter. As long as the address area overlaps part of each address, the addresses should be extracted correctly.
Sending Letters
If not already entered, enter your email address in the Email field at the top of the Mailroom Viewer.
Click on the Next button.
After a short pause, the Mailing Review screen will be displayed, shown below. Verify that displayed mailing options are correct.
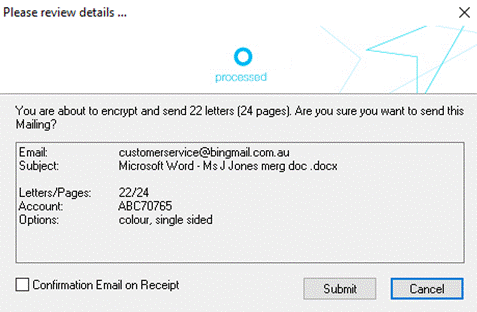
Fig 5.1
If you wish to make changes to any options, click Cancel, then alter relevant settings in Mailroom Options.
Mailroom Options

Fig 5.2
TO
Shows all extracted document data for the selected letter (usually postal address).
If other data is captured, the top of the window becomes a drop-down, and displays other extracted fields (e.g. email address).
Email
User email address. Used to send email acknowledgements (if enabled). Also used by Bing Customer Service to identify a sender.
Department
Used to differentiate Bing invoice costs Can also be configured as a drop-down. For each unique entry, a summary can be generated isolating costs.
Colour
Drop-down indicating all black & white / colour options, for both the addressed document and any attachments.
Profile
Bing production options. Enabled by Bing Customer Service, and pre-loaded from the Bing web service every 24 hours, or by Mailroom Update (Help > Check for Updates)
P Order
Purchase Orders (visible only when enabled). Allows a user enter a purchase order no. by mailing, or to assign a fixed purchase order no. to a department (department drop-down must be enabled) by clicking on the ellipsis.
If purchase orders have already been assigned to a department, use the department selection to assign the purchase order number.
Double Sided (duplex)
When checked, enables double sided printing. Note: Even if you select double sided printing, each section of your mailing (shown as separate icons below the document preview) will start on a new page. For example, a three page letter with a one page attachment will be printed on three pages (two pages for the letter and one page for the attachment).
Price Estimate
Request a real-time price estimate from Bing.
You may change the department, email, single/double sided setting or colour mode. Any items changed will only be effective for the current mailing. To change the default settings, use the Presets dialog under the Mailing Menu – refer to Configuring Default Presets. If a department list has been defined for your installation, the department box will be available as a drop-down. If profiles have been enabled they will also be a drop-down.
The Mailing Subject may be altered using the Mailing menu option Rename.
If you wish to send the mailing, click Next (if changes were made) or click the Submit button. Your mailing will be packed, compressed, encrypted and uploaded and a Bing Mailing receipt will be displayed. Note: If you have elected for submission confirmations via email, the email will confirm the successful upload to Bing – the receipt screen (shown below) does not necessarily imply a successful upload to Bing.
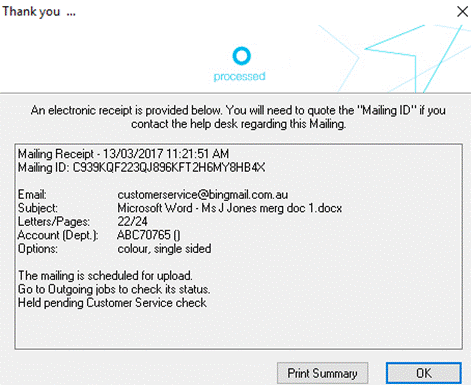
Fig 5.3
Mailings are encrypted using 2048 bit RSA encryption and are only decrypted at our secure production centres. Status for your mailing will not be available until it has been successfully uploaded to Bing. The moment your pack has been successfully uploaded to Bing, we will send your email confirmation (if requested).
*If you disconnect your internet connection before this process has finished then your mailing may get stuck in Uploads and be rejected. If you have to turn your PC off in a hurry please wait until the mailing receipt and email confirmation (if requested) have been received.
Navigating around a Mailing
The Mailroom Viewer
The Mailroom Viewer is the final stage in the mailing process. Here you can preview your document and navigate around it to check that it is to your satisfaction before you send it. The full details of the Mailroom Viewer can be viewed inside the Wizard page. Otherwise the main elements of the Mailroom Viewer are:
The Envelope List
If your mailing is a mail merge or an invoice run (e.g. from MYOB or Quickbooks) then it will have multiple letters within it. The recipients of these letters are listed in the Envelope List. You can view any of these letters by clicking on the icon associated with the name you want to view. In this manner, you can check that each letter is the correct number of pages and the Address extracted is correct. You can also change the view of the Envelope List in a similar manner to any Windows folder. If you right click on the pane itself you have the choices; of large icons, small icons, list or details (the default). In list or detail view, you may have to expand the Envelope List to the right by dragging the window divider across a far as you need.
The Document List
The second element of the Mailroom Viewer is the Document List. If you have more than one document in a letter this is the area that you can use to preview your letters documents. These documents are the parent mailing and its attachments (if any). Any attachments that you send with your letters will show up as icons in the Document List along with the mailing. Clicking on these icons will enable you to preview your attachments in the preview pane. Clicking on the mailing icon will take you back to previewing the letter you have selected.
If there are no attachments to your letter this pane will not be displayed.
The Document Preview
The final element in the Mailroom Viewer is the Document Preview. It is here that you can see contents of your letter and/or attachments. The display size for the Document Preview can be altered by the options in the View Menu. See the Menus page for further detail.
The Status Bar
The Status Bar shows you the number of letters and pages in your mailing. The Status bar is located at the bottom of the window.

Fig 6.1
The Navigation Controls
The Zoom buttons
The Zoom buttons allow you to Zoom in (+) and Zoom out (-) the view of your mailing.
The Back and Next Buttons
The Back and Next buttons are alternative buttons to the control buttons at the bottom of the screen.
The Mailing Navigation buttons
The Mailing Navigation buttons let you navigate through the pages of a letter. The single triangles move you one page at a time and the triangles with a bar on one side will move to the last or the first page of a letter.
For a full list of the above buttons and there descriptions see the Toolbar heading inside the Wizard page.
The Control Buttons
The control buttons are located towards the bottom of the Mailroom Viewer. They are:
Back Moves back to the beginning of the Wizard (Welcome Wizard Screen).
Next Proceeds to the final step of submitting your mailing. The Mailing Review screen.
Close Closes the current mailing (you will be prompted to save your mailing if not done so already). The user will either return to the Mail Items Summary Screen (if the mailing was opened from the Mail Items Summary Screen initially), or the Mailroom will close after confirming the deletion if the mailing/document was printed directly to the Mailroom.

Fig 6.2
Attachments
Attachments are usually photocopies, brochures or advertisements that you would like to send with a letter. Attachments always start on a new page (e.g. the first page of an attachment will not be printed on the back of the previous letter or attachment).
Saving an Attachment
You must first save an attachment in the mailroom so you can add it to a letter later.
To save a document as an attachment select Save as Attachment in the Wizard Welcome Screen. Once you click Next the Mailroom Viewer will open displaying the attachment you have printed to the Mailroom. There are two ways to save, the first is by clicking Save under the Mailing Menu (CTRL+S). The second is to press the Save button in the Mailroom Toolbar. You may also click Close under the Mailing Menu, you will be asked whether or not youd like to Save your attachment first, before the Mailroom Viewer is closed.
Add a Saved Attachment to a Letter
If you wish to add a previously saved attachment to a letter for sending, select the Letter and check the Add Attachment check-box in the Wizard Welcome Screen and click Next. After confirming your address extraction box location, click Next again and the Attachment Choice screen will be displayed and you can select the attachment to add to your letter.
If you need to add more attachments simply click the back arrow, and you will be directed back to the Welcome wizard screen where you can repeat the above process as many times as necessary.
With multiple attachments added to your mailing you will see the Document List populate:
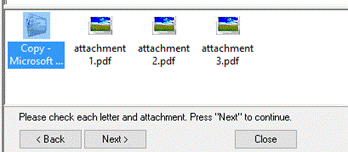
Fig 7.1
The icons in the document list can be re-ordered to print in any specific order. Attachments will print in order from left icon to right icon. I.e. the first attachment to appear in the recipients letter/envelope will be the attachment icon furthest to the left in the Document list and the last attachment to appear will be the icon furthest to the right. To re-order an attachment, right-click on the relevant attachment and click Move Up ,Move Forward, Move Backward or Move Back.
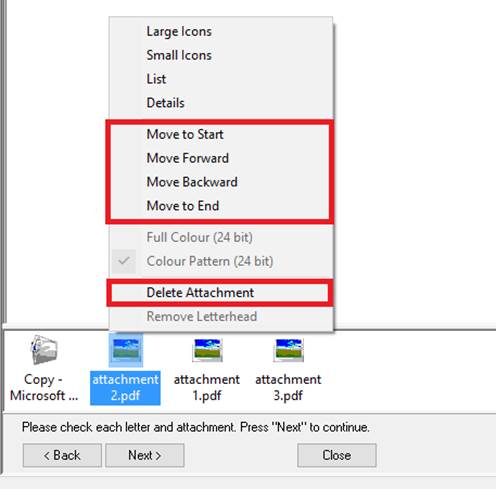
Fig 7.2
Move to Start will move the document to the first position in the letter, Move Forward/Move Backward will move the document one position Forward/Backward and Move to End will move the document to the last position in the letter.
You can also Delete the Attachment.
Note: Right-Click > Delete Attachment will delete the selected attachment in all letters inside the mailing, not just the current letter in the preview screen.
Working with Letterhead
Letterhead is printed on each page of a letter before the contents of the letter are printed. Single page letterhead is used only for the first page of each letter. Letterhead that includes multiple pages is printed on every page of each letter. If the letterhead is shorter than the letter, the last page of the letterhead is repeated. Note that portrait letterhead will not be printed on landscape pages and landscape letterhead will not be printed on portrait pages.
Saving the Letterhead
You must save a letterhead so you can add it to a letter later. Like saving an attachment (above), you can save a document as letterhead in the Welcome screen once printed to the Mailroom.
To save a document as letterhead select the Save as Letterhead option in the Wizard Welcome Screen, then click Next. Once you click Next the Mailroom Viewer will open displaying the Letterhead you have printed to the Mailroom. There are two ways to save, the first is by clicking Save under the Mailing Menu (CTRL+S). The second is to press the Save button in the Mailroom Toolbar. You may also click Close under the Mailing Menu, you will be asked whether or not youd like to Save your attachment first, before the Mailroom Viewer is closed.
Add Letterhead to a Letter
If you wish to add a previously saved letterhead to a letter for sending, select the letter you wish to open. Once open in the Mailroom Viewer, click the back button to enter the welcome Wizard. Check the Add Letterhead check-box in the Wizard Welcome Screen and click Next. The Letterhead Choice screen will be displayed and you can select the letterhead to add to your letter, at this point you can also select if you wish to apply the letterhead to every page of the letter. If there are grouped letters you can also choose to only apply the letterhead to the first page of the group. Once selected, you will then be taken to the Main preview page for final analysis before submitting.
Other Features
Import/Export
The Import and Export options are found in the Actions drop-down menu. These commands give you the option to import and export an entire mailing for use on another computer with the client loaded on it.
To utilize simply click Actions > Import. Then select the .EZP file that you wish to import to your Mailroom.
To Export a certain mailing already open in your mailroom simply click Actions > Export. You will then be asked where youd like to save the .EZP file.
Exported mailings may also be emailed to your customer service representative along with any support requests or other enquiries.
Rerun Wizard
The Back button in the Mailroom Viewer allows you to rerun the wizard on an unsent mailing so you can change the format of the mailing before you send it. For example, you can rerun the wizard to add another attachment or document to your mailing.
Change Account Details
The Account Details Screen can be accessed from the Mailing Menu. When you send your first mailing this screen will appear asking for your email address. Your email address is used to receive mailing confirmations. When your submitted mailing has successfully uploaded to Bing, you will be sent a confirmation which will include the Bing Mailing ID. It is advised you utilise this service as the mailing ID can be very important should you need to track or search for previous mailings. It is a good idea to check that your details are correct in the Account Details screen.
Refresh, and Status Update
Refresh (accessed from the Mailing menu or from the Mail Items Summary view) can used to get a status update of your mailing in Bing production. When you Refresh you may need to wait a few moments while your details are updated. Once your details have been updated you will see the icons that are used to represent the letters in your mailing will change to represent your letters status.
Note: The updated status information will not be available until the mailing has been processed and validated by the Processor (successfully submitted). This may take some time depending on the size of your mailing, if the server is busy or there are network difficulties. Please contact your support centre if the updated status is not available for a mailing within 24 hours.
Clean Database
The Clean Database function is located under the Actions Menu. This function minimizes the disk space required for your Mailroom database. It is recommended practice to clean your Mailroom often when it is being used frequently.
Cleaning removes mail items from the deleted items directory (not visible). Note: To achieve a successful compression of your mailroom database, the user must first delete all redundant or obsolete mailings from the Mailroom. To simplify, the Clean Database function is simply removing/clearing/compressing the Deleted folder to reduce the size of the Mailroom database. If you dont delete any items from the Mailroom first, the Clean Database feature will not reduce the size of your database.