The EasyPost® Mailroom allows you to submit letters that can be identified and separated using a department list. By using this feature you can request an invoice breakdown by each department. This may be helpful when you want to apportion cost of mailings between several departments or entities.
By default the department field is blank and can be populated manually each time you send mail – however, in this case you will not be able to request a department summary. To utilise department summaries, please call Bing Customer Service on 1300 309 800.
Department Lists may also be setup for other purposes, including:
- Changing your return address logo(s) between mailings. For example; sending mailings on behalf of different entities within the company. Using different return address logos can also allow the user to specify unique return addresses.
- Selection of different Bing production options.
Please call customer service on 1300 309 800 for details, and to enable.
Enabling Department list: (For Mailroom users wishing to edit/manipulate their department list). Note: If you are editing your department list, it is essential you notify Bing Customer Service to ensure your future mailings are processed correctly.
Setting up Department List
Step 1 – Open the Mailroom Configuration Utility.
Make sure all instances of the Mailroom are closed, including the watch mode Mailroom in the System Tray. To close this instance, right-click on the Mailroom icon (figure 1.1) in the bottom right-hand corner of your screen, and click Close.

Fig 1.1
Browse to “C:\Program Files\EasyPost\Mailroom” and double-click the configuration utility “MailroomConfig.exe”.
Fig 1.2
In the above example the Department List field is blank, so there are no departments set up for this Mailroom. This will be the case with new Mailroom installations, however a user may already have a Department list configured from a previous version of the Mailroom. In this case you would see a list of pre-configured departments shown in the example below.
Step 2 – Enter your Department list.
Departments are case and space (_) sensitive and must be separated by a semi-colon (;).
IMPORTANT! Do not use parentheses ( ) in your department names.
The example (figure 1.3) below shows a correctly entered Department list.
Fig 1.3
Above, the user’s three desired departments are: ‘QLD’, ‘NSW’ and ‘VIC’, allowing the company’s accounting department to differentiate the cost of mailings from three head offices, in Queensland, New South Wales and Victoria.
Once departments are entered correctly in the Department List field, click Save in the bottom-left corner of the Utility to store this list of departments.
Step 3 – Testing
Test by sending a document to the EasyPost Mailroom. Process that document up to the point of address extraction (“Draft” - shown below). You should now be able to select from a Department drop-down list.
NB Choice of a department before submission for processing is now mandatory.
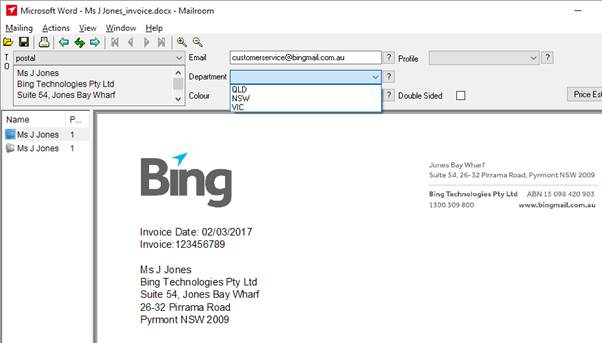
Fig 1.4
Step 4 – Implementation
After verifying your Department list you must now call Bing Customer Service (if you have not already) on 1300 309 800 to have the changes you desire implemented into the Bing Database and on to your account.
NOTE: Changing Department Lists without notifying Customer Service can lead to undesirable processing of your mailings.
Troubleshooting:
If after editing the Department list you are unable to view or select the new departments within the Mailroom, please call Customer Service on 1300 309 800.
Department List from an external file:
It is possible to keep a listing of departments in an external text file instead of inside the Mailroom Configuration Utility. This can be useful if a department list needs to be updated frequently, or, if there a multiple users that require the same department list. The fully qualified path (or UNC path) to the external file needs to be specified in the Department List field. The example below shows a local file, but the Mailroom configuration also supports UNC paths (e.g. \\server\share\departmentlist.txt).
Fig 1.5
Department List located at: C:\data\department.txt
Notes: The department list should be kept in a .txt file. It may be tab delimited with one or more columns. The first line in the file will be ignored – this is the header line. Either enter one department per line, or enter department name and if desired, an optional description, separated from the department name by a tab (as shown in the example below). The first column will be used as the department code and the second column will be used as the description. The description will be shown in the selection list but will be ignored for Bing invoices, reports or production options.
NB Do not include opening parentheses “(“ in your department codes, as all text after the opening parentheses will be ignored.
DepartmentCode              Description
29                          Marketing
38                          Sales
279                         Finance
Setting a default department
You can set one department from your list as a default that will be “auto-filled” each time for you by using Mailroom Presets. For a standard Mailroom installation, presets are saved under the user profile, thus one user’s presets will not be available to another user, even on the same workstation – however other options are available. Please read more about working with, and managing presets in the Help section Configuring default Presets.
Step 1
Open any letter you have within the EasyPost Mailroom (you can select from any category – Completed, Drafts or New). Form this view you can access the “Mailings” menu. Select “Presets” to open the Presets (Default Settings) screen as shown below.
Fig 1.6
Step 2
Select the preset shown with the “MatchText” column as .* as shown above and then click the Edit button, you will see a screen for Default Settings Configuration – similar to the one shown below.
Fig 1.7
Step 3
In this screen you can select a department that you wish to make your default department and then click the OK button; this will take you back to the Presets (Default Settings) screen. Click OK to exit the Presets (Default Settings) and close the Mailroom.
For all subsequent letters that you print to the Mailroom the default department will be pre-selected.
Note: This default department will be preselected only for “default” preset. If other presets exist, they will already have the department set that you selected or set in that preset.