EasyPost Mailroom consists of several components. Most users will require a complete "stand-alone" installation.
For more complex setups see the EasyPost Mailroom technical overview.
Complete Installation
The EasyPost Mailroom installation process will install these components onto your computer:
- EasyPost Printer Driver - Allows you to print to the EasyPost Mailroom from any application.
- EasyPost Mailroom - Software that lets you prepare your mailings for submission to Bing.
- EasyPost Mailroom Database Service - Stores mailings and the documents printed to the Mailroom printer driver.
- EasyPost Service - Manages configuration, status updates and document uploads to Bing.
Download the EasyPost Mailroom installation from the downloads page.
1. Run "EasyPost-Mailroom-v7-x64.msi".
2. The Setup Installation Wizard will be displayed, click Next.
3. After agreeing to the License Agreement, you will be asked to choose a setup type: Complete, Client or Custom See figure 1.1. Choose your required installation type. To change the installation folder you must choose Custom.
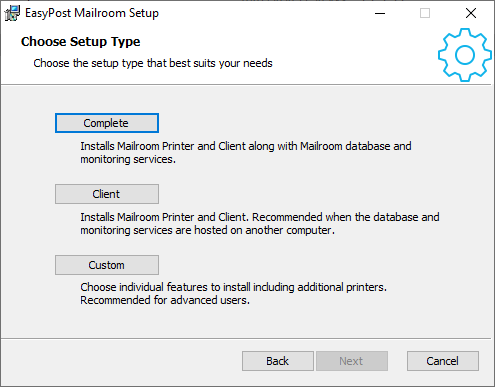
Fig 1.1
4. Select Complete and click Install.
5. When the installation has completed successfully click Finish to exit the wizard and Run the Mailroom Client.
Client Installation
A client only installation can be performed by choosing Client as the installation setup type. Alternatively you can download the client only installation msi package from downloads.
The client installation is desirable where all installations should be pointing to a single database and EasyPost service host.
Custom Installation
To customise your installation and install specific features, choose Custom as the installation setup type when navigating the install wizard.
Figure 1.2 shows the features that can be selected for install when choosing custom.
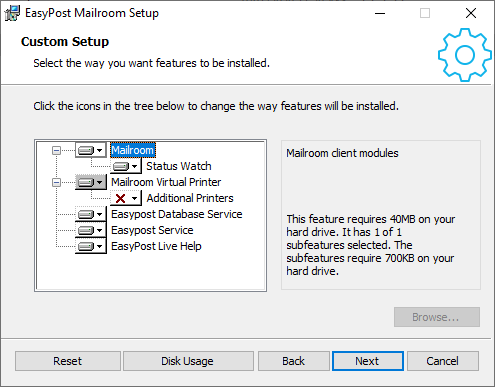
Fig 1.2
- Mailroom - Desktop application.
- Status Watch - Monitor submitted mailings status.
- Mailroom Virtual Printer - Virtual printer for printing documents to the Mailroom.
- Additional Printers - Add additional printer queues.
- EasyPost Database Service - Stores and manages content.
- EasyPost Service - Service for managing Mailroom user configuration, uploads and updates.
- EasyPost Live Help - Live help remote support utility.
Upgrade
Mailroom 6 deployments can be upgraded in-place. To ensure compatibility upgrade the EPService and Database servers first.
1. Follow the installation steps detailed above in installation, acknowledging the additional upgrade screen in the wizard.
2. During upgrade a Files in Use dialogue may appear. See figure 1.3. Choose option "Do not close applications. A reboot will be required", and click OK to continue.
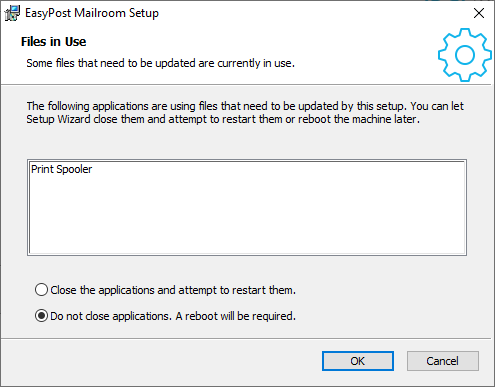
Fig 1.3
3. When the Mailroom client has been successfully upgraded click Finish.
With the Mailroom upgrade completed you should verify your document history from within the Mail Items Summary screen.
Cmd Line Installation
EasyPost Mailroom can also be installed through the cmd line or AD using group policy.
The /qn msiexec options set no UI and quiet i.e. no user interaction.
Option MSIRMSHUTDOWN=2 will handle files in use i.e. printer driver held in open applications. Sometimes required on removal/upgrade.
To perform a complete install of the EasyPost Mailroom:
msiexec /i "EasyPost-Mailroom-v7-x64.msi" /qn
To install EasyPost Mailroom features:
msiexec /i "EasyPost-Mailroom-v7-x64.msi" /qn ADDDEFAULT={Feature Codes..comma separated no spaces}
E.g. for client features only i.e. no database or EasyPost services use:
msiexec /i "EasyPost-Mailroom-v7-x64.msi" /qn /norestart MSIRMSHUTDOWN=2 ADDDEFAULT=MailroomFeat,StatusWatchFeat,PrinterFeat,LiveHelpFeat,VCRedists
To remove the EasyPost Mailroom use:
msiexec /x "EasyPost-Mailroom-v7-x64.msi" /qn /norestart MSIRMSHUTDOWN=2
Note. msiexec contains many options and it is sometimes necessary to add the norestart and MSISHUTDOWN parameters to bypass issues with windows print spooler and printer driver warnings.
Product Features
Features:
| MSIExec Feature Code | Custom Installation Feature | Description |
| VCRedists | N/A | Always required when performing MSIExec feature installations |
| MailroomFeat | Mailroom | Desktop application |
| StatusWatchFeat | Status Watch | Monitor submitted mailings status |
| PrinterFeat | Mailroom Virtual Printer | Virtual printer for printing documents to the Mailroom |
| DBFeat | EasyPost Database Service | Stores and manages content |
| EPSvcFeat | EasyPost Service | Service for managing Mailroom user configuration, uploads and updates |
| LiveHelpFeat | EasyPost Live Help | Live help remote support utility |