EasyPost Service
Each mailroom application must connect to an EasyPost Service. This is so the mailroom knows where to print to i.e. which database and host.
Stand Alone installations run their own EasyPost and Database services and will connect to themselves unless configured to connect to another host.
In Client-Server installations the mailroom client will determine, in the following order, which EasyPost Service to connect to.
-
C:\ProgramData\EasyPost\MailroomConfig.json is an override configuration file that can be deployed with mailroom clients and can point to a service host. e.g.
	{
	"svc_host": "myserver"
	}
Or use your own environment variable in the file e.g.
	{
	"svc_host": "%ephost%"
	}
- EP_SVC_HOST - Bing's pre-defined environment variable. The mailroom will use this variable if it has been set.
- Localhost - The mailroom will attempt to connect to localhost.
- Discovery - The EasyPost Mailroom client sends out a udp packet to IPv4 multicast address 239.4.5.6 and IPv6 address ff45:6:45:6:45:6:45:6 A listening service will then respond with a hostname and port e.g. myserver.root.local:45677
- If the client cannot connect using any of these methods a dialogue will appear, and the user can enter an EasyPost Service address. This is then stored in the MailroomConfig.json file.
For mailrooms to use a dedicated EasyPost Service to perform uploads, point clients to the service host using one of the methods detailed above.
Environment variables can be either system or user scoped.
EP Service Configuration
EP Service configuration is accessed from the Config menu. Proxy settings, notifications, listening ports and auto discovery can all be configured here.
Server Access
Proxy settings can be set on this tab. See figure 1.0
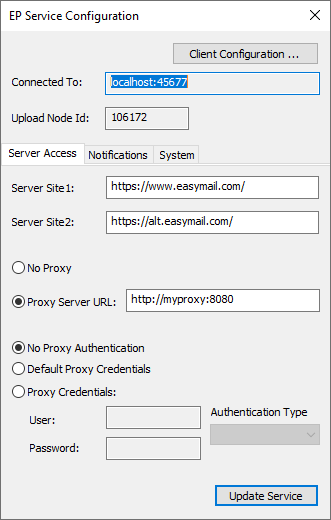
Fig 1.0
Notifications
From the notifications tab enter the server name, the to and from email addresses and any auth requirements. SMTP communication may be secured by checking Use SSL, which will invoke STARTTLS. See figure 1.0.1.
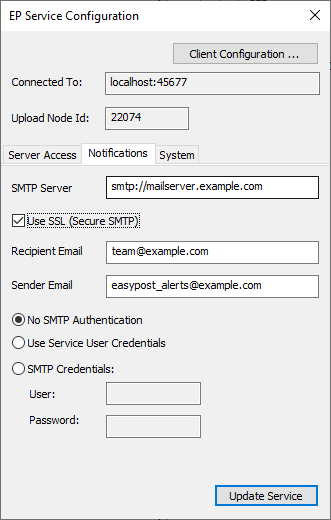
Fig 1.0.1
System
From the System tab the listening ports for the database and ep services can be changed. You can also Disable Discovery which stops the service responding to client multicast discovery attempts. See figure 1.0.2. Please seek advice from Bing Customer Service before changing these settings.
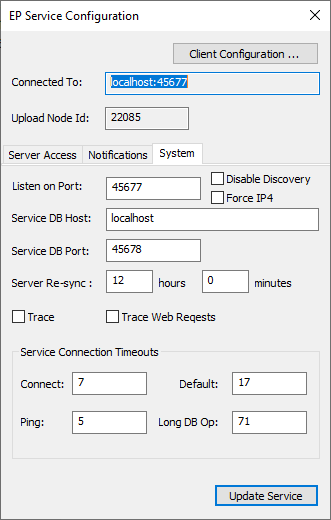
Fig 1.0.2
Settings
Configuration settings are accessed from User Settings available under the Config menu item.
Settings in Mailroom 6 are applied in a hierarchical fashion and are stored in categories in a dedicated .config database.
By default the full configuration tree is hidden to users. In this way users can only make changes to settings affecting themselves.
For advanced or power users, Bing customer service can grant admin privileges, which enables an administrative view of the configuration tree. Admins can change settings that will affect some, or all users. See figure 1.1 and 1.2 for user and admin views of the configuration tree.
User View
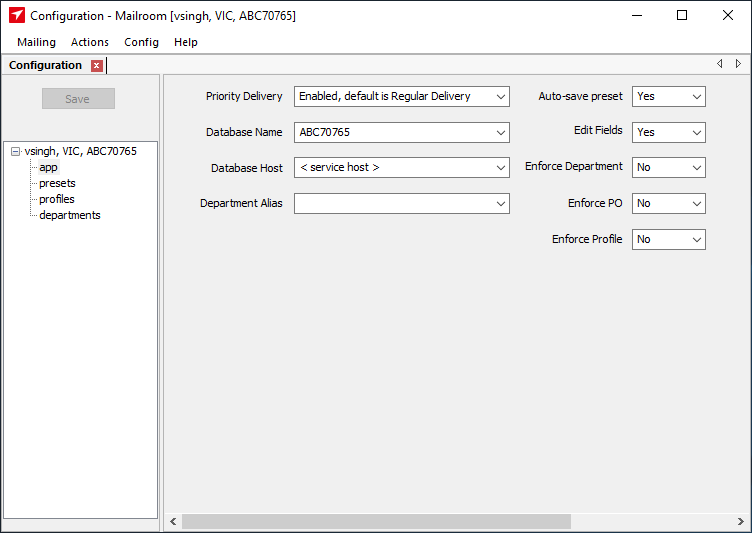
Fig 1.1
Admin View
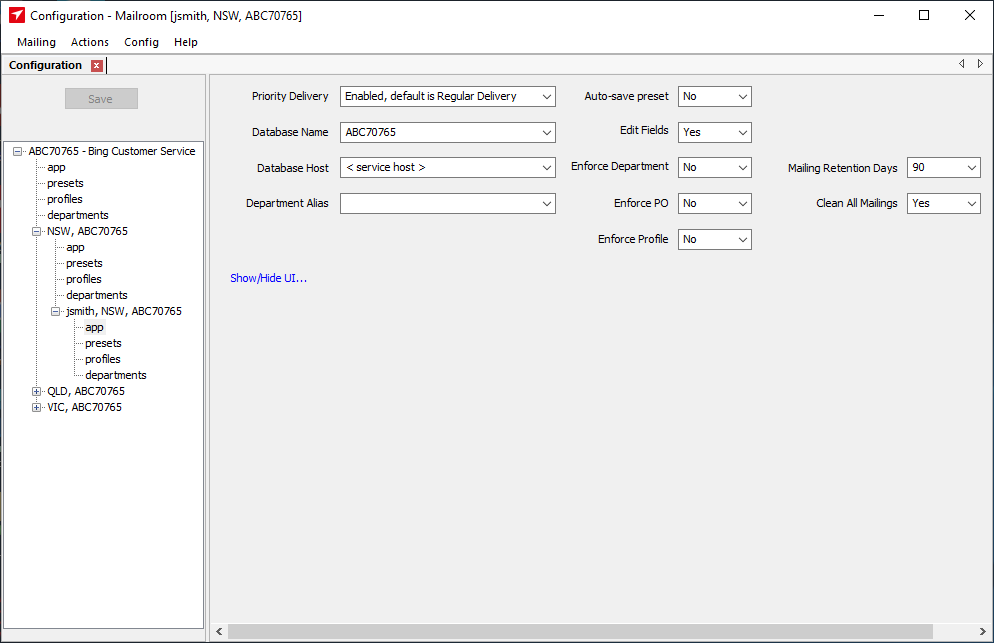
Fig 1.2
Categories
- app - application level settings such as database host and name.
- presets - document and mailing presets.
- profiles - profiles used for server side production options.
- departments - department lists can be used in billing.
App
Priority Delivery
Australia Post delivery method. Can be set to regular or priority. Default setting is the drop down selector is available to users, with the default method being regular.
Database Name
By default the database name will be the set to your account code e.g. ABC12345 and users registering to this service will share the database. The database name can be changed as required.
If the database name is unset i.e. blank then a personal database will be created, with your username, on the service host.
Database Host
Stand Alone installations will by default host their own databases and use their own EasyPost Service to upload mailings to Bing.
If database host is left unset i.e. blank then connecting clients will use the EasyPost Service host as the database host.
The database host can be set to any host running the database service.
Department Alias
Change the label of the department lists drop down menu.
Auto-save preset
Default Yes. Creates a new preset each time a new document is printed to the mailroom.
Edit Fields
Default Yes. Allows user to create and edit fields data after extraction.
Enforce Department
Default No. Forces users to enter or select a department.
Enforce PO
Default No. Forces users to enter a purchase order, if enabled in the UI. See Purchase Order above.
Enforce Profile
Default No. Forces users to select a profile.
Mailing Retention Days
Default 0. Configure a number of days mailings to retain. Upon EP Service start and at 1am every Sunday, EP Service will run a database clean function with the configured number of days. The clean will deleted any unused data and submitted mailings older than the days configured. Default 0 will suppress the clean i.e. keep all mailings forever.
Clean All Mailings
Default No. Yes will enable the database Mailing Retention Clean process to clean up all packs, not just submitted mailings i.e. Attachments, New and Draft items. Only applicable to Mailing Rentention Days.
Presets
There are 2 types of presets, document and mailing. A document preset MUST reference a valid mailing preset.
The settings you choose when completing the wizard for a document extraction, by default, are automatically saved into a new document, and mailing, preset each time. When the same document name is printed again the Mailroom will use those saved settings.
Presets ensure the consistent extraction of data and application of mailing settings, without having to choose them each time a document is printed to the mailroom.
Document Presets
Document presets contain settings such as the blue box co-ordinates, the fields to be extracted and any advanced settings used for data extraction.
The document preset used is determined by the filename of the document printed. The filename is matched using a regular expression in the document preset. The 1st preset to match will be used. Presets are matched from top to bottom with a global preset matching all documents if no other match is found.
To create a preset for a template, print the document to the Mailroom and complete the wizard. The auto-save preset function will create the associated document and mailing presets. These presets can then be edited to make them permanent, see making presets permanent below. See figure 1.3 for a set of document presets, the blue ones are the current users presets, the presets in black text are inherited.
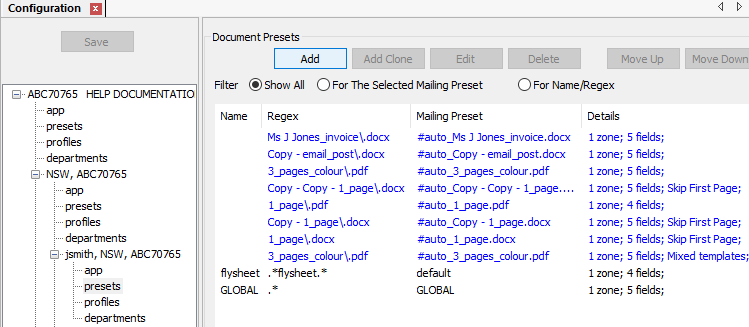
Fig 1.3
Auto created document presets have no name but do have an Autogen Date, see figure 1.4, and if unused for 90 days are deleted.
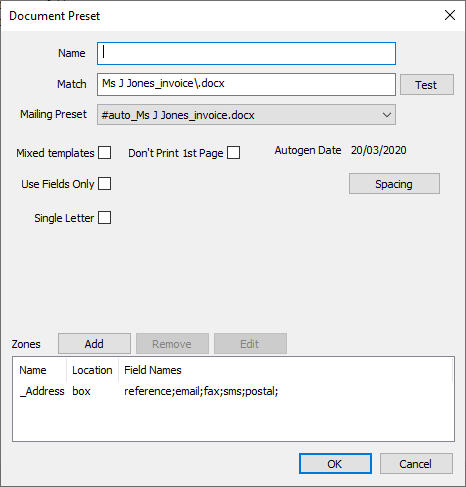
Fig 1.4
Mailing Presets
Mailing presets contain settings specific to the mailing e.g. production options, colour model, duplex and department. See figure 1.5 for a list of mailing presets.
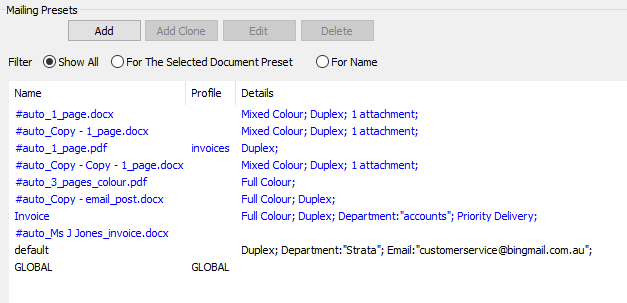
Fig 1.5
As well as setting the mailing attributes the mailing presets also control the processing mode of the documents being printed. See figure 1.5.1.
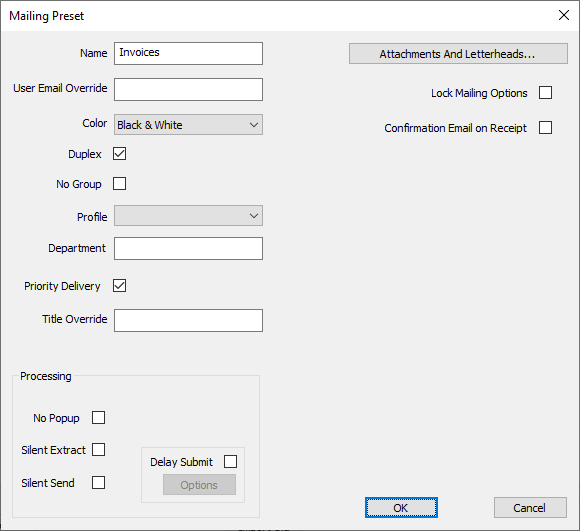
Fig 1.5.1
Processing Modes
No PopUp - Disables the mailroom application opening after printing. The document will remain un-processed in Drafts.
Silent Extract - Disables the mailroom opening but will perform an extraction. Document will remain in Drafts as processed, ready to manually submit.
Silent Send - Disables mailroom opening, performs an extraction and then submits to Bing.
Processing modes are cumulative from the top down i.e. Clicking Silent Send automatically checks all three modes, likewise clicking Silent Extract automatically checks No PopUp.
Delay Submit
Mailings are held for later submission, will be consolidated together, and submitted when trigger points are reached. Triggers can be based upon the consolidation count i.e. number of mailings and 1 or more time points. Delay submit can only be used with silent send.
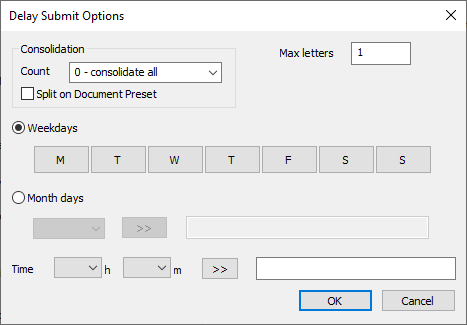
Fig 1.5.2
Making presets permanent
It's often desirable to make some presets available to all users. This is achieved by editing existing auto-created presets. Editing the automatically created presets removes the Autogen date and makes them permanent.
- Edit the mailing preset, change the Name and click OK.
- Edit the document preset, change the Name and then select the Mailing Preset renamed in step1. Click OK.
In figure 1.6 the Ms J Jones Invoice document and mailing presets have been edited, renamed, and the regular expression for file name match has been broadened to match all files ending with invoice.docx.
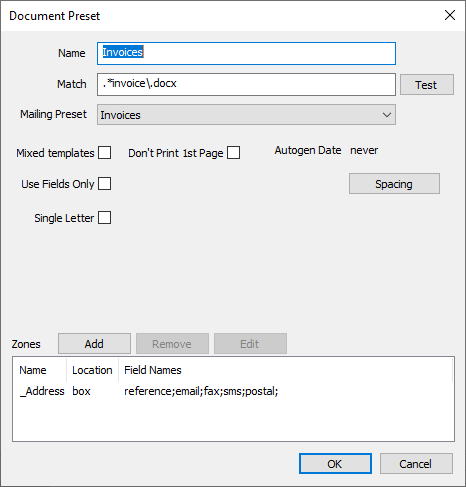
Fig 1.6
To make the presets available to more users of an account, Admins can move them up the configuration hierarchy 1 step at a time by clicking Move Up Level. This moves both the document and it's associated mailing preset up the tree. The presets will then be inherited by all users of the account and or organisational unit. See figure 1.7.
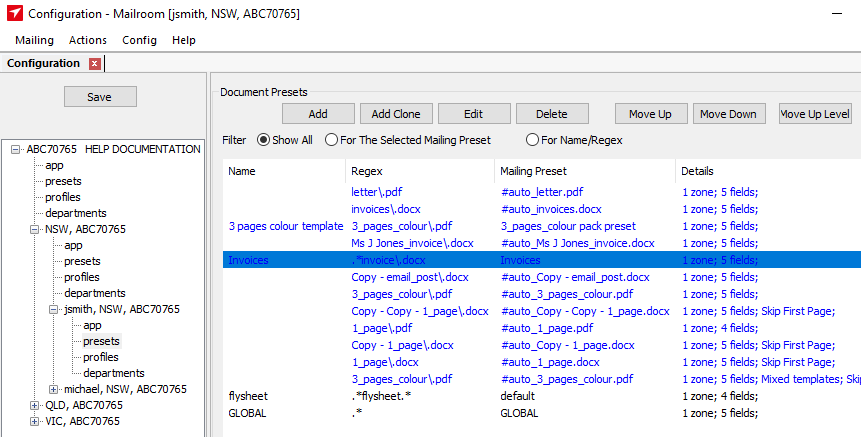
Fig 1.7
Profiles
Profiles are created by Bing Customer Service and are used to select various production options e.g. registered post, return address logos, email and sms templates.
If enabled, a list is available in the mailroom and they're then selectable from a drop down list in the user interface.
When profiles are in use they are visible here on the configuration tree.
Departments
Departments are used as a way to differentiate or categorise mail you send. This is beneficial for reporting, audit and cost allocation.
Departments can be entered ad-hoc or made available in the form of a drop down list in the user interface.
To create a list, click the "Don't Use Inherited" button. Click "Add" to add departments singularly, or click "Import From File" to load a CSV data file. The importer expects 2 columns, the 1st is the department, and the 2nd is a non-obligatory description.
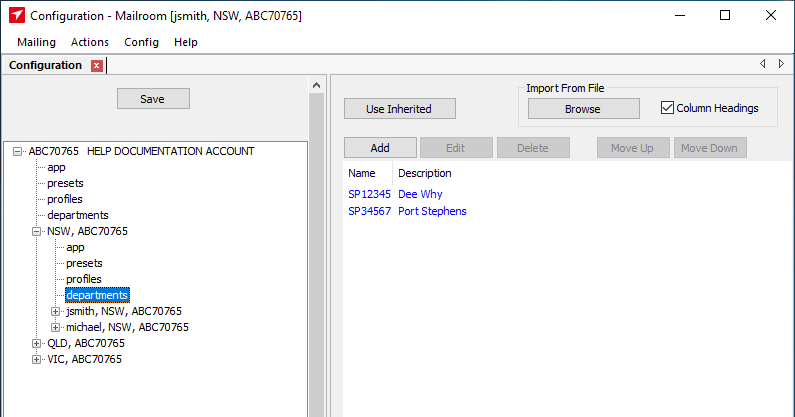
Fig 1.8
A department list can be made available to all or some users depending on where in the configuration tree hierarchy it is created. Figure 1.8 shows a department list created at the OU, NSW level. All users registering to this OU will inherit this department list.
Purchase Orders
To use purchase orders please contact Bing Customer Service to enable the feature.
Purchase orders can either be entered ad-hoc in the P Order field, available in the Mailroom Viewer or they can be fixed by setting in the configuration. When fixed in configuration an expiry date must also be set.
Figure 1.9 shows a purchase order set in the configuration under NSW. Users under NSW will inherit this and all mailings will be sent with the purchase order set.
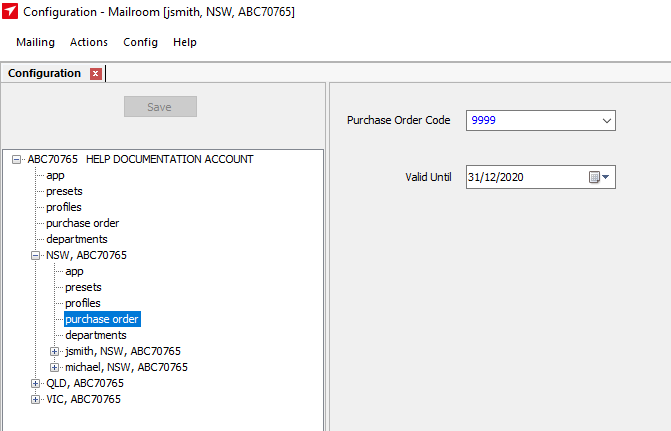
Fig 1.9
If a user attempts to send a mailing with an expired purchase order, the Mailroom will issue a warning prior to submission, and the user can choose whether to proceed.