The Wizard is launched when documents are printed to the Mailroom printer, and will help you to construct a mailing.
Welcome Screen
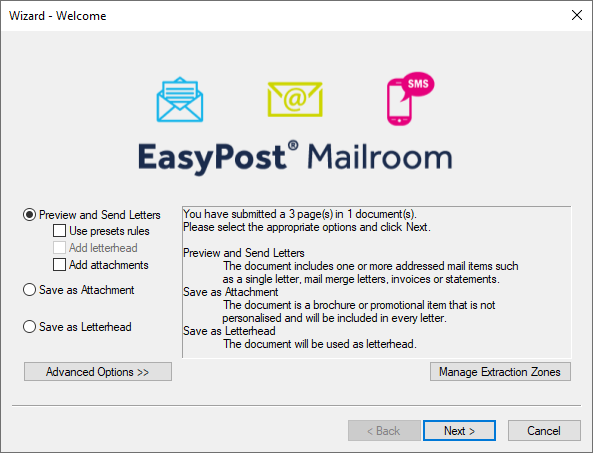
Fig 1.1
When you print to the Mailroom Printer, the Mailroom Wizard will automatically be activated.
The Wizard guides you through the process of selecting the mailing options for your print job. Here you can choose to send a letter, or save as an attachment or letterhead. You can also add attachments or letterheads to existing letters.
The Preview and Send Letters button
This option is used for all addressed documents. Depending on the documents previously loaded into your mailroom, three sub-options are available to you when you select this option:
Use presets rules - Selecting this option tells the mailroom to process your mailing according to the preset rules you have defined (see the section on Presets for more information).
Add letterhead - If you have previously saved a letterhead, this button will be enabled. Selecting this will add a step to the Wizard to select which letterhead to use.
Add attachments - If you have previously saved a document as an attachment, this button will be enabled. Selecting this button will add a step to the Wizard to select which attachments you wish to add to this mailing.
If this option has been selected, progress to the next screen by clicking Next.
The Save as Attachment button
This button is used to store a document as an attachment for use in any mailing. If you select this option and then click Next you will be forwarded to the Mailroom Viewer, showing both a preview of the now saved attachment, and a complete list of all available attachments.
Attachments are a great mechanism to include common content in mail outs. By saving documents as attachments, you can include them in multiple mailings easily. You can add multiple attachments to any mailing.
The Save as Letterhead button
This button lets the Wizard know that you will be saving a document as a Letterhead. If you click this button and then click Next you will be forwarded to the Mailroom Viewer, showing both a preview of the now saved letterhead, and a complete list of all available letterheads.
Letterhead provides a means of under-laying your documents with another document (the letterhead).
Advanced Options
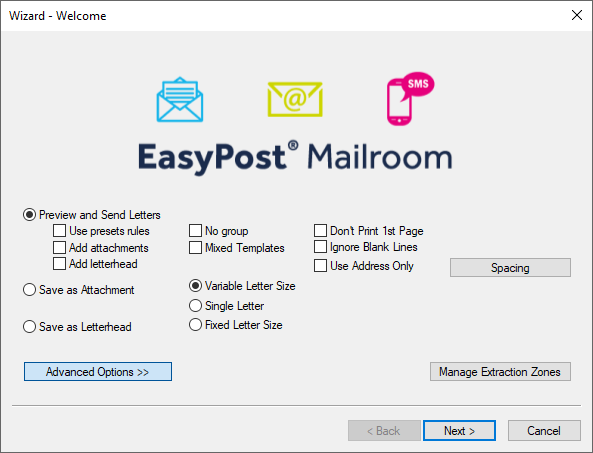
Fig 1.2
Advanced Options are sometimes used to configure processing for specific document requirements:
No Group - By default, the mailroom will group together, into the same envelope, all documents with identical address metadata. Selecting this feature will disable grouped letters so all letters to the same recipient are sent separately.
Mixed Templates - This feature changes the behaviour of the EasyPost Mailroom to be less sensitive to other document elements, including images, when determining the start of a letter. Commonly used when using multiple templates in a mail-merge.
Don’t Print 1st Page - Use this feature to suppress printing of the 1st Page when the 1st page is used only to extract the address and is not a required part of the mailing.
Ignore Blank Lines - Enabled by default, this feature will skip over blank lines around an address location to join text together. While a valid address should never include a blank line, it is common for applications to output addresses with them.
Use Address Only - This feature uses only the extracted data to determine the start of a letter.
Variable Letter Size - This is the mailroom's default setting where the mailroom will attempt to extract an address from all pages of the document.
Single Letter - An address extraction will be attempted on the 1st page of the document only.
Fixed Letter Size - Define a fixed number of pages for letters. An address extraction will be attempted on the 1st page of each new letter. e.g if set to 5, address extraction will be attempted on pages 1,6,11 and so on.
Spacing - These complex options handle how spaces are extracted, or not, from a document.
Address Capture
The Address Capture screen is the second step in the Wizard process. Here you select the area in which the address appears in your letter.
By default, a blue pin is dropped in what we have calculated to be the most common address location, what we call the most probable point. See figure 1.3.
When the most probable point is used, text all around is read and joined together to form an address.
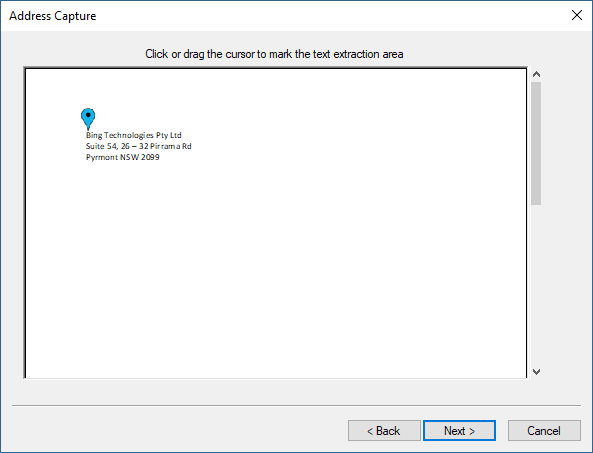
Fig 1.3
Alternatively you can draw a blue box around your address. In the Address Capture Pane click and drag your mouse from any corner around your address data. See figure 1.4.
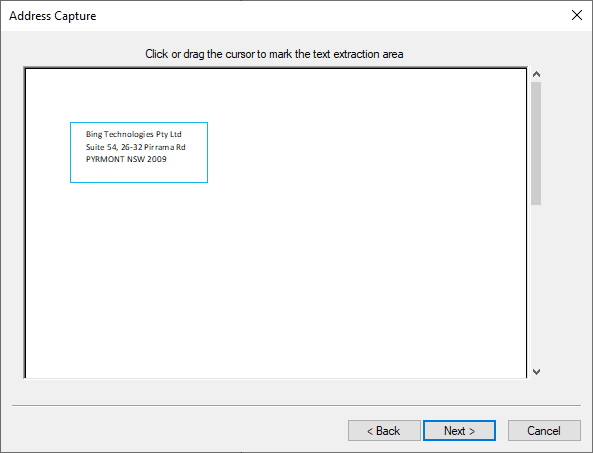
Fig 1.4
The blue box should be smaller, rather than larger, and does not need to cover the entire address block as the box will automatically expand. If the address box is too large and makes contact with other content, this can cause additional data to be extracted.
The EasyPost Mailroom extracts your address information from this selected area from each letter in your mailing. If the basic address block criteria i.e. 2-7 lines, each containing 1-72 characters, is not met, you will receive an error notifying you which address(es) are invalid.
Address Example:
Bing Technologies
Attn: Mr. Joe Bloggs
99/987 Example St
SYDNEY NSW 2000
A two page Australia Post explanation fact sheet can be viewed by clicking here.
Please also refer to the full Australia Post Address guidelines.
Click Next to Continue.
Select Attachments
Check the box of each attachment to be added to the mailing.
Once you have selected the appropriate attachments click Next.
Note that the order of documents can be changed in the Mailroom Viewer.
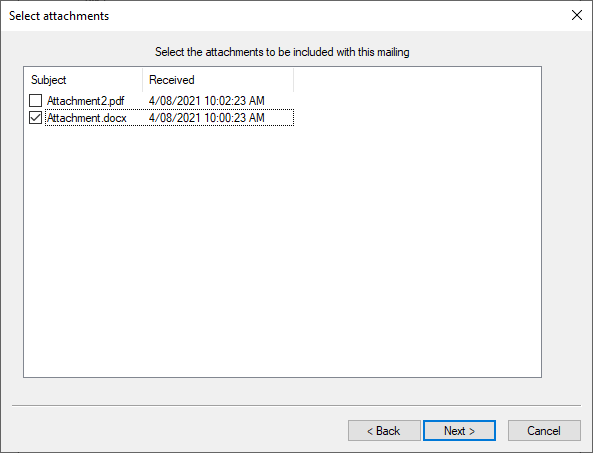
Fig 1.5
Click the Next button to continue.
Select Letterhead
If you have selected Add Letterhead, you will be prompted to add your letterhead from the list of previously saved letterheads. Check the box to select one.
Once you have selected the appropriate letterhead, right click it to set your options. See figure 1.6.
All Pages - Apply to all pages.
Letters - Apply to letters.
Attachments - Apply to attachments. Then select which attachments. See figure 1.6.1.
First Letter Section - Apply only to the 1st letter of multiple letters grouped in an envelope.
On Top - By default letterheads are underlayed. This settings overlays it. Required if your document is not transparent, as the letterhead may be hidden.
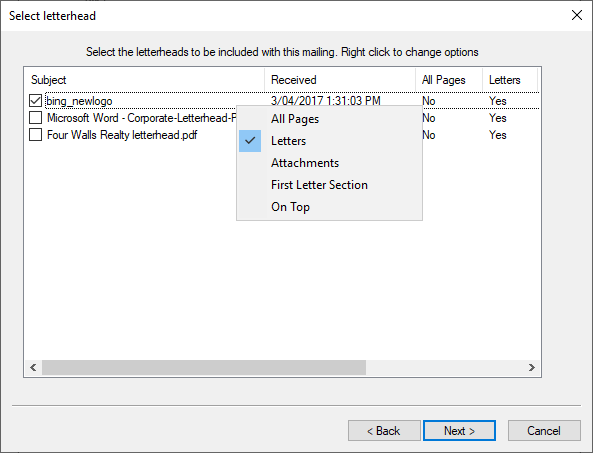
Fig 1.6
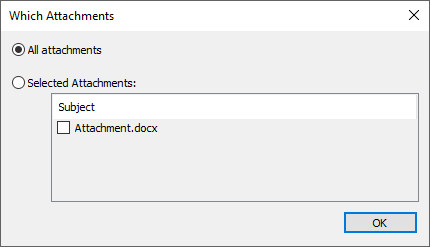
Fig 1.6.1
Click the Next button to review your letters in the Mailroom Viewer.
Mailroom Viewer
The Mailing Preview screen displays a list of all letters in the mailing. Above the list is the extracted address data for the currently selected letter.
Care should be taken to ensure that the correct data has been extracted and that each letter has the expected number of pages. A count of letters and pages is visible in the bottom right corner of the screen and should always be checked.
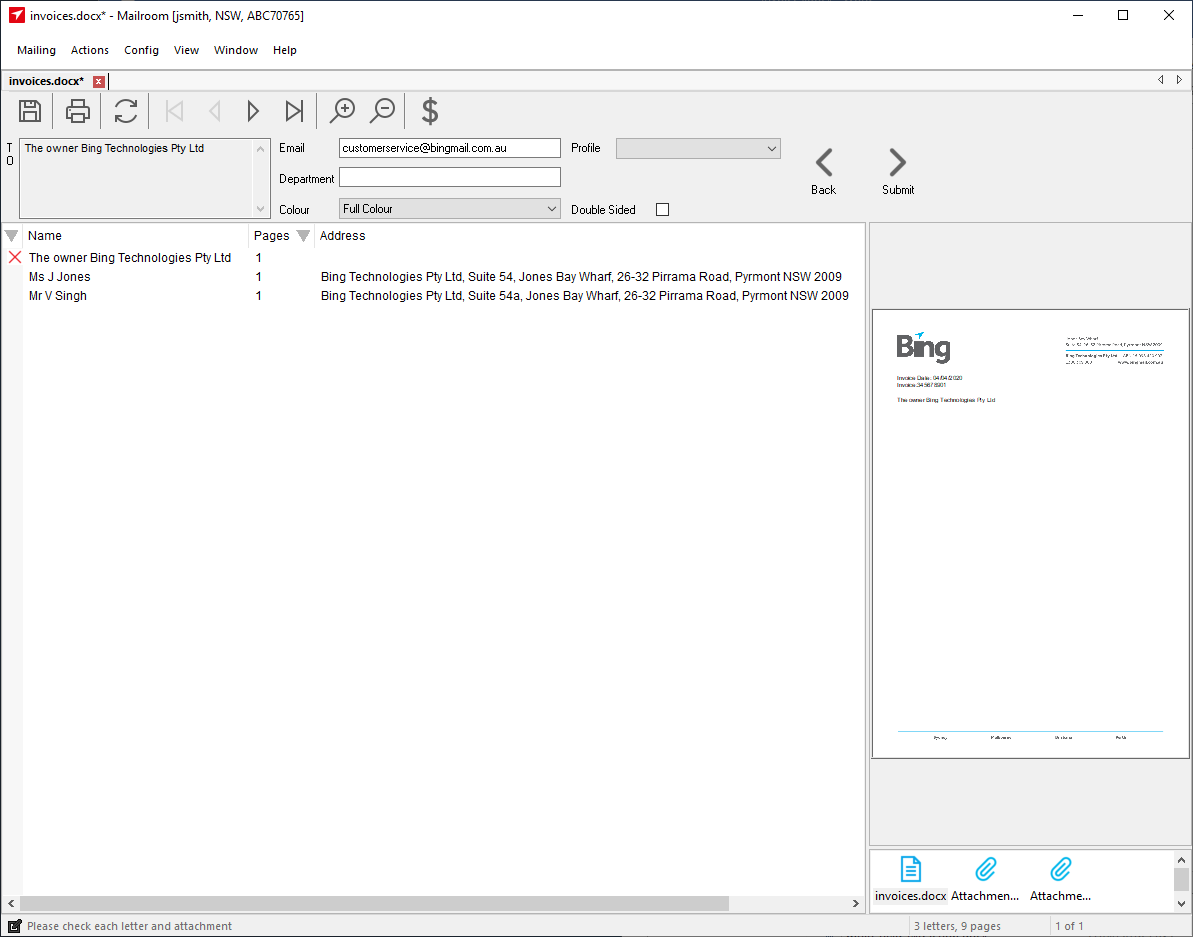
Fig 1.7
Figure 1.7 shows the 1st letter in the list with a red X next to it. This indicates the letter is invalid and cannot be submitted as is. The example letter has only 1 line in the address and will not be able to be processed. In this case it can either be deleted by right clicking and selecting delete letter or the field edited, see Edit Fields below. If the letter had a bad extraction e.g. picked up non-address text around it or did not extract the rest of the address, then the wizard can be re-run and the extraction box or other settings tweaked.
Mailing options: colour model, email address of the current user, department and doubled sided can be set in this screen.
The right hand pane displays a preview of the printed documents, these can be scrolled through using the toolbar controls or using your keyboard.
Below the document preview is a list of the documents, if more than 1, within each letter. The example in figure 1.7 shows 3 letters, each with 2 attachments. The documents are in the order they will appear in the envelope when produced. Documents can be right clicked and moved forward or backward in the order.
The $ button is for requesting a price estimate. This is based on the number of letters, pages, colour model and other mailing options. Check the Reply via email box and Bing will send the estimate to the email address in the mailing.
Letters can be searched in the Mailroom Viewer by right clicking any letter and clicking Find Letter. This opens a dialogue where letters can be searched by index or by extracted field. See example search in figure 1.8.
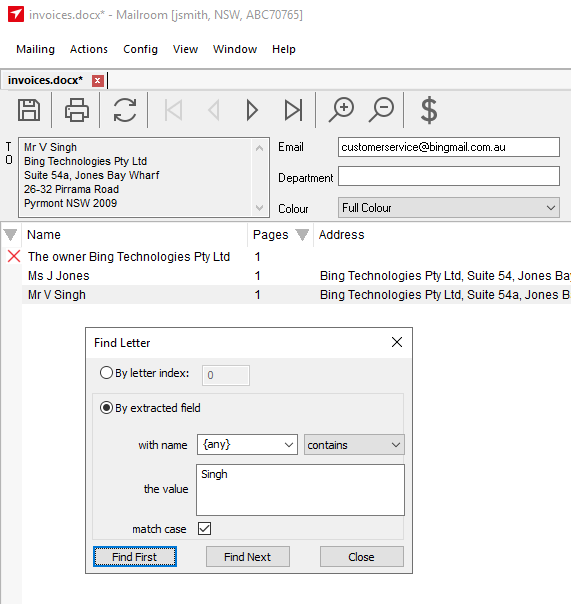
Fig 1.8
Following the letter review in the Mailroom Viewer, click Submit to send your mailing to Bing.
Edit Fields
Introduced in version 6.4 is the ability to edit extracted data fields or even add fields to those already extracted.
In figure 1.7 we can see an invalid letter where there is only a single line of address data extracted. Rather than delete this letter it is possible to edit the field and manually add the address.
With the letter selected, click the drop down icon in the To: field and click *Edit Fields... From here you can edit or add fields.
Figure 1.9 shows the address having been entered in the Edit Fields dialogue, with figure 1.9.1 showing an edit icon next to the now valid letter.
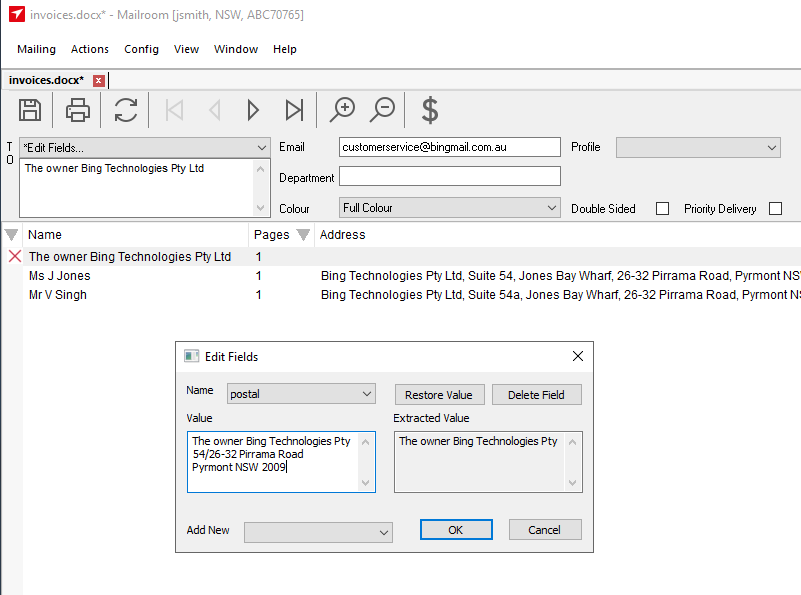
Fig 1.9
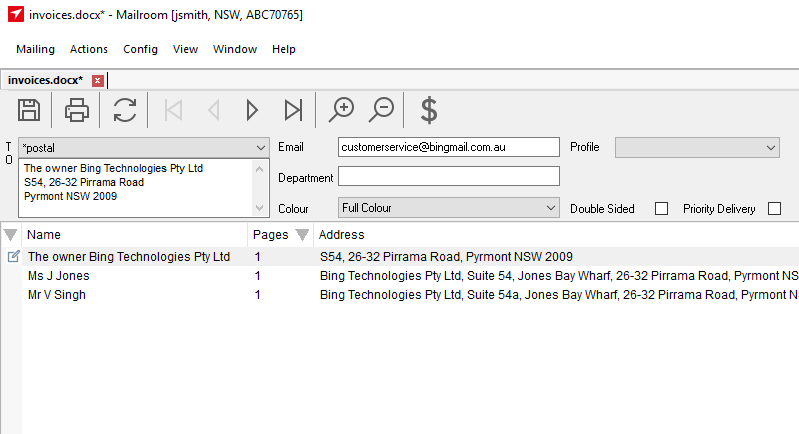
Fig 1.9.1
Submit Review
A final review of the mailing and the options chosen is presented before final submission. Attention should be paid to the number of letters and pages.
Check the box to receive a confrmation email and when you click Submit, your mailing will be uploaded to Bing.
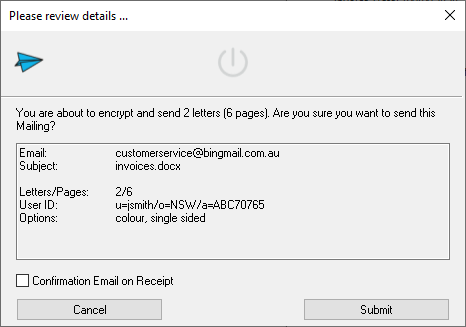
Fig 1.10
An additional feature, Scheduled Release is also available for SMS and Email customers. This feature allows customers when sending SMS and Email reminders, to set a release date and time within the next 30 days, following submission to Bing. The button to set this becomes available when enabled by Bing.
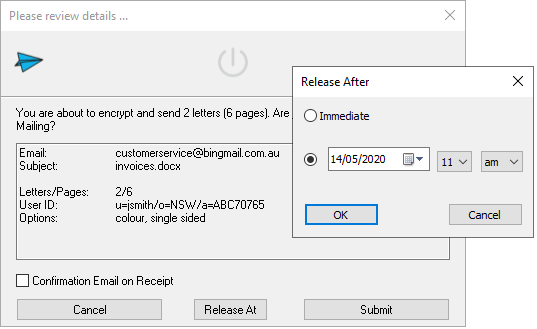
Fig 1.10.1
Receipt
The Receipt marks the end of the mailing’s journey through the creation process. This screen shows you a receipt that tells you a Bing Mailing ID and other details of the mailing that you have sent. The 6 digit Mailing ID should be used when speaking to Bing Customer Service.
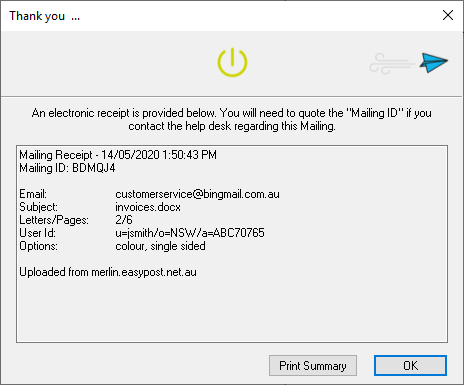
Fig 1.11