Automating the EasyPost Mailroom
The EasyPost Mailroom can be configured with ‘Preset Rules’ to allow it to be partially automated; where documents process through to the point of submission without user intervention, or fully automated; documents are processed and submitted to Bing without user intervention or review.
This process relies upon two consistencies:
- Documents can be created with specific file names (Bing has a configurable printer driver solution to address this if required) and
- Presets exist within the Mailroom to align with these specific file names.
A Preset can be configured to apply to a specific document name, or a pattern or string within the document name, using a regular expression. The print job name will usually be the same as the filename of the document, however this depends on the application doing the printing. By aligning a specific prefix, or string, in the print filename to align to a specific rule, documents printed to the Easypost Mailroom can be processed using settings defined by the rule.
Multiple Preset Rules can be set up to align to various production options, such as mono vs colour, simplex vs duplex, including attachments or letterhead, paper stock type, company logo (as appears through the upper envelope window), address location and many more.
Note: Automating the EasyPost Mailroom using ‘advanced Preset configuration’ should be implemented with due care and thorough testing. File names incompatible with existing preset rules can result in incomplete processing of your mail.
The configuration of a Preset rule is outlined below under the heading Creating or Modifying Presets; however first, information on the two types of Presets must be clarified.
Preset Types
There are two ways to match a Preset rule to an inbound print/file/document name.
Title This type is text-based only, and must be an exact match between file name and a Preset rule.
For example, all documents printed from an invoicing suite are given/or receive the file name “ABCD_12345_invoice” and are to match a particular preset rule inside the Mailroom. The user would add a Preset rule and set the type to ‘Title’. The ‘Title’ field will be set as “ABCD_12345_invoice” to catch that particular file name coming from the invoicing suite.

Fig 1.1
Title Type (String of Text) matching the document name
Note: Some printing applications may attach a prefix or suffix onto the print/file/document name. For example, Printing from Microsoft Word will by default add the prefix “Microsoft Word – xxxxxxxxxx”. You may need to incorporate this text or behaviour into Presets of this type.
Pattern This is a string known as a Regular Expression (RegEx), and can match any print filenames containing specific patterns.
For example, an invoicing suite prints invoices with the file name “ABCD_xxxxx_invoice” (‘x’ represents any numeral). To build a Preset rule based on the constant pattern within the document name. I.e. begins with “ABCD_”, and ends with “_invoice”. The user must select a ‘Pattern’ type Preset rule. For this particular example (where the character ‘x’ represents any numeral) the RegEx should be: ABCD_.*_invoice

Fig 1.2
Pattern Type (RegEx) will match any file name starting with “ABCD_” and ending in “_invoice”
Using common Regular Expression inside Pattern Presets
The following are the most common Regular Expression Meta Characters that you will use:
| Meta Character | Description |
| . | Any Character |
| * | Zero or more of the previous expression |
| \ | Character following is to be read literally. eg, "\." represents a period (".") |
You will generally use these the . and * in combination as .* to represent that anything can appear in this place.
Examples:
| Reminder.* | Matches anything starting with reminder |
| .*\.txt | Matches anything ending in .txt |
By default the regular expression pattern matching is not case sensitive.
More information on regular expressions can be found at the following:
http://regexlib.com/cheatsheet.aspx
http://en.wikipedia.org/wiki/Regular_expression
Once confident the Preset will match the desired file name you may begin to configure the processing rules within the Preset, described below.
Creating or Modifying Presets
Firstly, inspect the list of presets currently in existence.
1. Open the Mailroom viewer (by opening any addressed document from the Mailroom’s Mail Items Summary)
2. Open the ‘Presets …’ dialog under the ‘Mailing’ tab, inside the Mailroom.

Fig 2.1
3. Check ‘Show All Patterns’ and ‘Show All Jobs’ – outlined in red in the image below. All current Presets will be visible. Depending upon the age of the database, you may see many ‘Title’ Presets (outlined in blue in the image below). By default, they are created every time a user sends a new unique file name to the Mailroom. You can turn this off by un-ticking “Automatically create or modify preset when Mailing is saved” (outlined in green in the image below).
4. Analyse current rules that appear and clean-up redundant rules if necessary.
NB: If a preset already exists that closely matches your requirements, you may wish to modify this rule, rather than creating one from scratch, as it will have the correct address extraction zone already set (see point 5)
You will notice that there is a ‘Pattern’ Preset with the Regular Expression: “.*”. This is the default preset rule (outlined in orange below) which will be used to process any documents that do not match any other rule.
Note: If you are only intending on printing file with names that match to specific Presets, you can (and should) turn off the ‘Automatically create or modify preset when Mailing is saved’ checkbox (outlined in green below). This will stop the unnecessary build up of new redundant ‘Title’ Preset rules (outlined in blue below).
If the ‘Automatically create preset rule…’ option is checked, a new ‘Title’ Preset is automatically created each time the Mailroom receives a new (unique) file name. This is useful when you require the Mailroom to remember certain settings applied to a particular file name.
Fig 2.2
5. To create a new preset rule, either click ‘Add’ at this point, or enable the “Automatically create and/or modify preset when Mailing is modified” check box and process a document that matches preset requirements.
Note: when drawing address extraction zone, smaller is always better. Provided the zone will always overlap part of the address, a complete address will be extracted.
Assuming “Add” is chosen, this opens the Configure Preset screen.
After inputting the ‘Pattern’ or ‘Title’ of the Preset to match the inbound document/file name (refer to Preset Types above).
Fig 2.3
Fig 2.4
Fig 2.5
Options that can be manipulated inside a Preset:
- Address location - the top, left, right and bottom boxes contain measurements/dimensions of the address box location/size, relative to the top and left edges of the page – See below. Measurements are in tenths of a mm ie 1000=100mm.
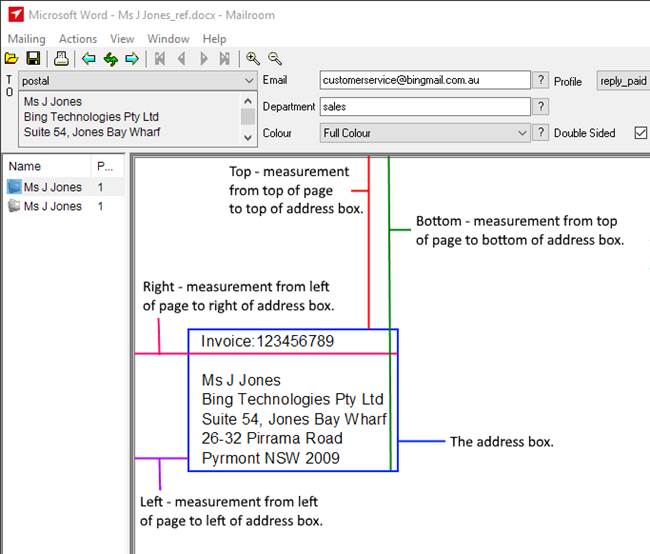
Fig 2.6
- Advanced Options (Address Options) - see the Advanced Options heading inside the Wizard User Guide document for details.
- Manage Extraction Zones (Address Options). This feature is used to remove extraneous data from addresses, and to extract non-address data from documents. Contact Bing Customer Service for details.
- Attachments – Add attachments previously been saved inside the Mailroom.
- Letterhead - Add Letterhead previously saved inside the Mailroom.
Grouped letter check box options – Apply letterhead to All Pages, or First Letter.
On Top option – necessary only when a document in front of an applied letterhead is not transparent.
- Silent Send – refer to the Full Mailroom Automation section below to configure automated sending via the Mailroom.
- Duplex – Single (simplex) or Double-sided (Duplex) printing.
- Regular Delivery – not enabled by default (requires a configuration change to activate). Allows lodgement on the Australia Post regular mail product (which increases delivery time by 2 days). Contact Bing Customer Service for details.
- Colour Mode – Select from drop-down list.
- Department – Either a pre-populated drop-down list, if this has been enabled within your configuration, or entered as free text.
- E-mail – users email address.
- Purchase Order Code - not enabled by default (requires a configuration change to activate). Allows input of purchase order information which may differ by preset, for display on the Bing invoice.
- Profile – invokes Bing-specific production options. Contact Bing Customer Service with your specific requirements if required, or not provided to you.
- Confirmation Email on receipt – an acknowledgement of the receipt of the mailing is sent to the email address shown in the preset.
Note: the options or settings defined within the Preset will only be applied to matching documents. To alter the processing behaviour of all letters sent to the mailroom you must modify the default Preset (type=Pattern:, MatchText=".*"), outlined in orange in the image above and, adjust its options accordingly. See Configuring Default Presets for further information.
6. Once the Presets have been created, you must order the Preset list appropriately. Presets are listed in priority order from top to bottom. The Mailroom will seek to match the document/file name to the topmost Preset first.
To re-order a Preset, select it, and press the Move Up, or Move Down buttons, until the rule is positioned in the desired order.
Note: the default preset (underlined in orange above) should always be positioned at the bottom of the list, It will match any file name, thus if positioned at the top of the preset list no other Preset rules will ever be matched. Having the default Preset rule at the bottom will allow the Mailroom to attempt to match other Preset rules first, before the default is applied.
7. Print a test document with the appropriate attributes to match the Preset rule to be tested and check the draft result.
Note: To test preset rules that apply Letterhead or Attachments, the Use presets rules checkbox in the Welcome – Wizard must be used. For other rules, manual Wizard steps can be used.
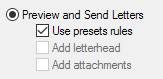
Fig 2.7
If the preset has been configured correctly, the address or addresses will be extracted correctly, the correct attachment (if applicable), letterhead (if applicable), colour mode, duplex selection, department etc. will all be applied to the mailing appropriately.
Full Mailroom Automation (Silent Send)
Background information:
If you select Silent Send for a preset rule, any mailing that triggers this rule will be uploaded to Bing automatically. This mode is used only if your documents do not require review, and you are confident of the accuracy your documents address data.
Silent Send rules typically process printed output directly from an application.
Setup
Before this mode can be used:
- A preset will need to be created and tested to confirm the desired processing outcome applied by the preset. This is done by first manually processing a document that matches the preset using the Use Mailing Rules setting. If the draft result is as expected this is a confirmation that the rule has been successfully applied.
- The printer driver Open Mailroom after print setting MUST be enabled. Disabling this feature also disables all Mailroom processing.
Once verified, Silent Send can then be activated for that preset. When activated, the warning shown below will appear. If you accept and understand the warning select Yes.
Fig 3.1
Once the setting is activated, all documents matching this preset will attempt to process through to submission to Bing. Documents that match, but fail processing for any reason (e.g. no address) will remain in the Unprocessed queue. These failures can be monitored through an Event Log monitor, or the Mailroom can be configured to send an email notification in the event of any processing errors. If this option is required, tick the Send Email on Error check box shown below.
Note: If Send Email On Error is not checked, when a document that is unable to be processed successfully is encountered (e.g. no valid address can be extracted), this will cause an instance of the Mailroom to launch the Wizard (if the user doing the printing is logged in). Otherwise, that instance of the Mailroom will not terminate. Other items will still process.
Fig 3.2
You may see the following message if the Mailroom is not able to detect SMTP settings in the Mailroom configuration. Click OK to close the alert box.
Fig 3.3
In order for the Mailroom to be able to successfully send an email alert, you need to configure and test the SMTP section in the Mailroom Configuration.