When full EasyPost automation is required, and multiple document types are processed, it may be necessary to install additional printer drivers if there is no method of controlling the print document file name. These extra virtual printers allow prefixing of document names in order to distinguish your documents for automated processing, using presets.
When you require automation based on printers but only one account to send the documents, you will only install multiple printers and a single Mailroom client.
When you need to process documents for multiple accounts, or require a separate mailroom database for some documents, this requires multiple printers aligned to multiple Mailroom client instances (each with its own separate database) to be installed. Each database will be registered to a separate Bing account.
Pre-requisites
An initial EasyPost Mailroom must be installed, minimum version required is v5. If multiple accounts are to be used, the EasyPost Spooler must also be installed. Install and test these according to the "Spooler-based Advanced Setup Guide". This document only addresses multiple printer and Mailroom client instance setup.
Installing Multiple Mailrooms
1. Using the Mailroom Configuration Tool configure the EPClient.ini file making sure that you configure the "basepath" setting so that the Mailroom client has a unique location for writing its database. For multiple clients you will need separate databases for each Mailroom client. e.g.
basepath=dbserver\sales
Test the installation, comfirming both upload and status.
2. Create a new folder where you would like to install a second copy of the EasyPost Mailroom - e.g. C:\Program Files\EasyPost\Mailroom-accounts. Copy the entire contents of the first client installation folder (by default – C:\Program files\EasyPost\Mailroom) to this newly created folder.
In Mailroom version 5 and newer the default location for EPClient.ini Mailroom configuration file is in C:\ProgramData\EasyPost\Mailroom\
Copy the EPClient.ini file from the default location to the newly created Mailroom-accounts folder, making sure that you configure the “basepath” setting so that this instance of the Mailroom Client uses a different database e.g.
basepath=dbserver\accounts
Installing Multiple Printers
1. Unzip the installation files to a new folder. Depending upon your computer architecture browse to either the x86 or x64 installation files and open the Multi-printer configuration file config.ini file for editing. Modify the strPrinterName setting to reflect your choice of new printer name for the new EasyPost printer OR, if this setting is commented out in config.ini (with a semicolon ";"), you will be prompted for a printer name when running the executable.
If installation of additional printers is to be aligned with multiple Mailroom clients OR Mailroom installation is not in the default installation location:
You will need to modify the “EP Client” section (at the end of the config file) with proper paths and files that point to the default Mailroom location, or the additional location(s) created in step 2. This step needs to be performed before the addition of each additional printer for multiple Mailrooms.
The setting paths required to be aligned to the default, or additional Mailrooms are:
strAppStarterFile=<filepath>\EPStarter.exe
strEPDLLName=<filepath>\EPAPINT.DLL
strEPAppExeFile=<filepath>\EPPreview.exe
strEPAppWorkFolder=<filepath>\
Default values are:
strAppStarterFile=C:\Program Files\EasyPost\Mailroom\EPStarter.exe
strEPDLLName=C:\Program Files\EasyPost\Mailroom\EPAPINT.DLL
strEPAppExeFile=C:\Program Files\EasyPost\Mailroom\EPPreview.exe
strEPAppWorkFolder=C:\Program Files\EasyPost\Mailroom\
2. Open the Multi-printer configuration file config.ini file for editing (if not already open).
The strDocNamePrefix parameter, by default, will prefix input filenames with the printer name and is used for environments where the filename cannot be amended or controlled (such as SAP printing) to align input document name with presets. If this is required, leave the following entry as is.
strDocNamePrefix=<<PRINTER_NAME>>-
If not, comment out the setting with a semicolon and save the amended config.ini file.
3. Run "PrnDrvInstall.exe" as administrator and then click the “Install” button.
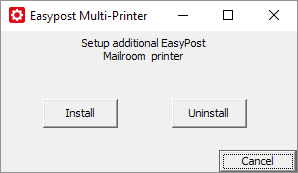
Fig 1.1
You will be prompted for a printer name. After successful installation, you will now have a new printer with the same name as you manually entered. NB In Windows “Devices and Printers” view, only one printer icon (device) will display. Selecting Properties for this icon will display multiple queues, one per device. To display or alter printer properties for each device, select it from the list.
For installing additional printers simply repeat step 3. For installing additional printers aligned to multiple Mailrooms, ensure the paths indicated in step 1 are corrected before performing the next install.
Testing
Print documents to each printer and process them manually. Ensure that:
- Your documents are viewable using the correct Mailroom if multiple Mailroom client instances have been installed, are written the correct database, and that it is distinct for each client. NB the desktop shortcut and Startup icons created on installation are for the initial client installation only. The Startup icon is responsible for Mailroom status update when the client is not in use, so mail items will not be automatically updated in second and subsequent mailroom databases.
- Your documents have the correct prefix, if this parameter was used.
- Your documents have been processed by the correct preset.
Troubleshooting
You can check that additional printer settings are correct by looking in the registry values under the printer.
[HKEY_LOCAL_MACHINE\SYSTEM\CurrentControlSet\Control\Print\Printers\Mailroom\PrinterDriverData]
Replace "Mailroom" with the name of the printer you wish to check at the registry setting:
Uninstall/Removal
Simply delete the additional printer icon from your list of printers, or the executable can be run and the driver uninstalled. Additional Mailroom clients and databases can simply be deleted, although the original instance should be properly uninstalled through add/remove programs.