EasyPost Mailroom has the capability of extracting address and other metadata from multiple areas in a document.
Regular expressions are used to identify and extract data and also to validate the extracted data if required. The regular expression engine in the Mailroom has been expanded to support perl like syntax making it much more powerful. A complex extraction and validation can now be made with only a few characters, examples follow further in this document.
Configuring Multiple Extraction Zones
The extraction zones feature is available either through the wizard in [Figure 1.1] when printing a document to the Mailroom or when editing a preset (see Advanced Presets Configuration).
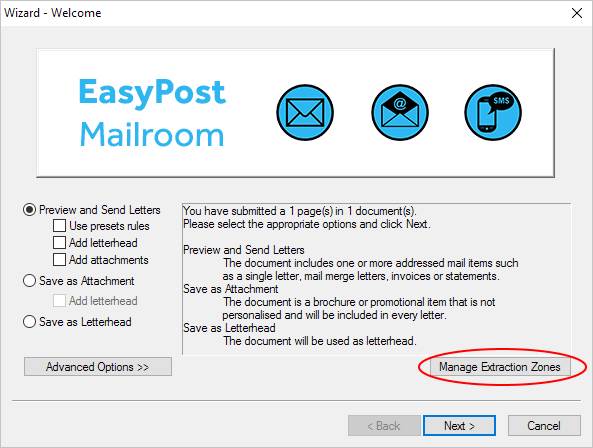
Fig 1.1
The Extraction Zones dialogue [Figure 1.2] lists all configured extraction zones and from here you can create a new zone, edit a zone or delete a zone.
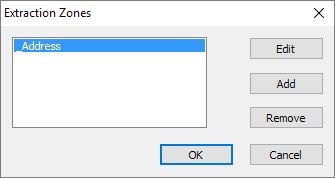
Fig 1.2
By clicking Edit you will enter the default extraction zone called _Address. This zone contains the default extraction fields as detailed in [Figure 1.3]. From this dialogue you can create a new field, edit a field or delete a field.
Note: Field names are unique across all extraction zones.
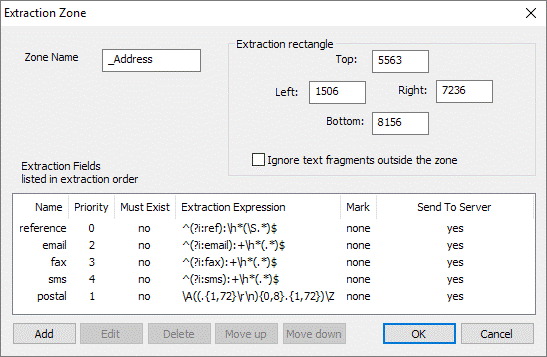
Fig 1.3
The default _Address zone contains the reference, email, fax, sms and postal fields and are extracted in the order shown from top to bottom. These fields can be re-ordered by selecting a field and then clicking Move up or Move down.
If for example your document has an email address following the postal address then the fields should be re-ordered appropriately. It may also be necessary to change the regular expression depending on the document.
Based upon the default _Address zone and field extraction expressions a letter containing a reference, an email and a postal address would appear as below. The reference and email could even be input as white text and therefore invisible to the recipient. The Mailroom will still extract white text.
ref:ABC1234565789
email::test@testcompany.com;
Mr A B Sample
123 Sample Street
SAMPLEVILLE NSW 2999
It is possible to delete fields from any extraction zone and if required add them to a new extraction zone e.g. your letter reference may be located at the bottom of the 1st page of your letter and therefore outside of the blue box that you will draw around your address zone. In this instance you should delete the reference field from the default _Address zone, add a new zone and then add a new field to the new zone, choosing reference as the field template.
To add a new extraction zone return to the Extraction Zones dialogue [Figure 1.2] and click Add. The zone is given a default name ExtractionZone2 [Figure 1.4] which can be changed and initially contains no extraction fields.

Fig 1.4
Field Types
To add a field click Add and select a field template [Figure 1.5].
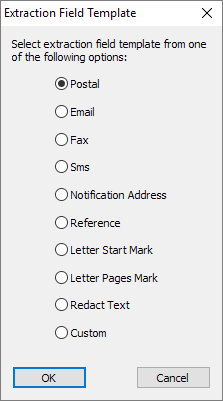
Fig 1.5
Default field types and usage are detailed as follows.
Postal Address Capture
Emailing documents using the EasyPost Mailroom
Faxing Documents using the Easypost Mailroom
Utilise a reference ID in letters
Letter Start Mark
This field type if used defines the letter separation based upon a common identifier. It will override the Mailroom’s inbuilt algorithms for defining when a new letter starts. E.g. you could have a single piece of text “Page 1” that appears on the 1st page of each letter. By defining the text within the extraction expression the Mailroom will then extract the metadata and use it as the letter separator. Each new letter will start where “Page 1” is extracted.
Note that the Send to Server flag is not checked [Figure 1.6]. This means that this metadata is not sent to the server because it is a separator.
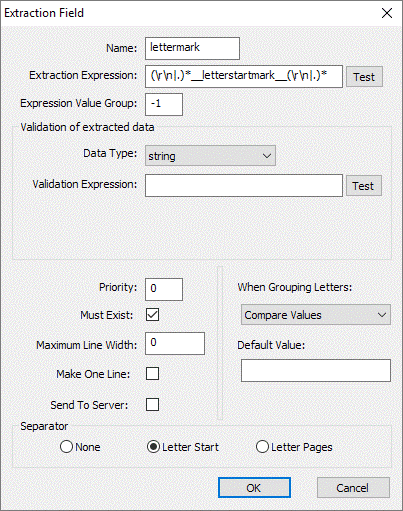
Fig 1.6
Letter Pages Mark
This field type if used defines the letter separation based upon the page count. It will override the Mailroom’s inbuilt algorithms for defining when a new letter starts. For example, your documents may always contain a number on each first page indicating the number of pages within each document (“Page x of y”). The default extraction expression for the page count uses the string “pagecount:” and then expects a number to follow. This is the number that the Mailroom will use to count the pages and will then separate the individual letters based upon this number.
Note that the Send to Server flag is not checked [Figure 1.7]. This means that this metadata is not sent to the server because it is a separator.
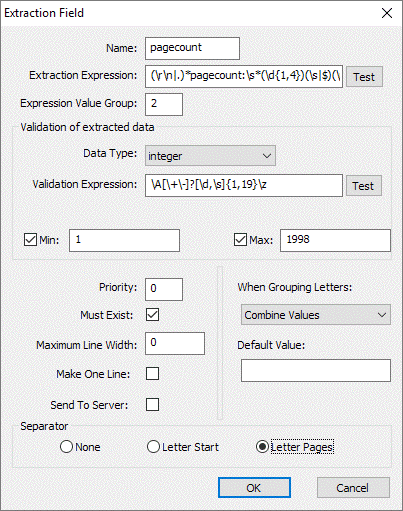
Fig 1.7
Redact Text
This field type can be used to remove text from an extraction zone. An example of where this may be useful is when each letter address starts with “Invoice To:”.
Invoice To: Mr A B Sample
123 Sample Street
SAMPLEVILLE NSW 2999
The example extraction expression [Figure 1.8] will extract “Invoice To:” and because Send to Server is not checked the extracted metadata is wiped from the extraction zone. For this example to work you would have the place the redact field on top of the postal field within the extraction zone. The postal field would then extract as:
Mr A B Sample
123 Sample Street
SAMPLEVILLE NSW 2999
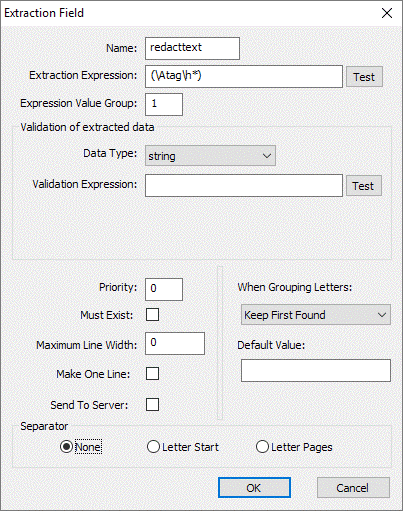
Fig 1.8
Custom
This field type allows completely custom fields [Figure 1.9] to be created if the existing templates do not fulfil the customer requirements.
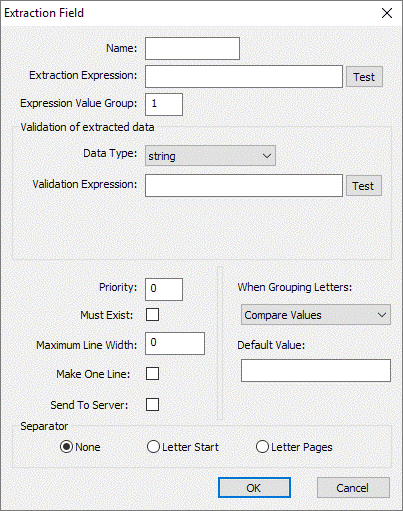
Fig 1.9
Data Types
This section focuses on validating the different data types available in the field templates, not on the extraction. It is best to use a template and then edit the extraction expression for additional fields.
The extraction field default templates all use the default data type string. The Mailroom now supports different data types and can validate extracted data as any of the following 4 data types.
string
default data type comprising any text.
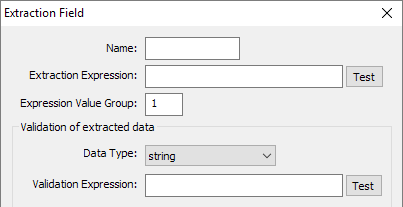
Fig 2.1
integer
A positive or negative number. Min and Max values can also be set. [Figure 2.2]

Fig 2.2
floating point
A positive or negative number followed by a decimal point and further digits. [Figure 2.3]
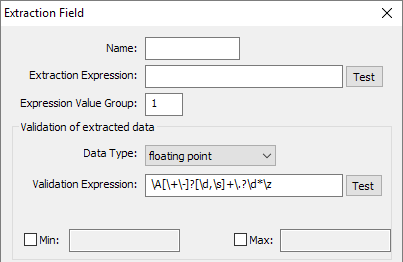
Fig 2.3
Date and/or time
This field is predefined in 4 different formats, although for this field type the validation expression is editable due to the huge variance in date time formats. The user is free to choose a format and then change the validation expression if the format does not fit the actual date format required.
Eg. The date format in a document is 1 November 2012. The nearest format in the date field type is DD/MMM/YY so we need to amend the validation expression as follows.
original validation expression: \A(?<day>\d?\d)/(?<month>[^/ \d]{3,9})(/(?<year>\d{2,4}))?\z
amended validation expression: \A(?<day>\d?\d) (?<month>[^ \d]{3,9})( (?<year>\d{2,4}))?\z
This replaces the slashes with spaces as per the actual date data. [Figure 2.4]
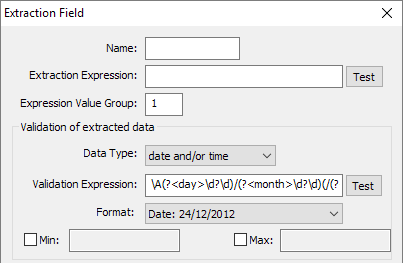
Fig 2.4
Testing Fields
Extraction fields also offer the ability to test. You can test the extraction expression or the validation expression. Just click the Test button next to the expression you wish to test and enter the data.
The following example shows the reference field extraction expression being tested. The expression looks for ref: at the start of the block “ref:” followed by any number of space or tab characters “\s*”. Now we reach the parentheses which is value group 1 and will be what is extracted. (\S.*) means don’t match the spaces at the start of the line then match any character any number of times. Finally it is followed by \r\n which translates as carriage return followed by new line.
Figure 3.1 shows the extracted value from the original text.
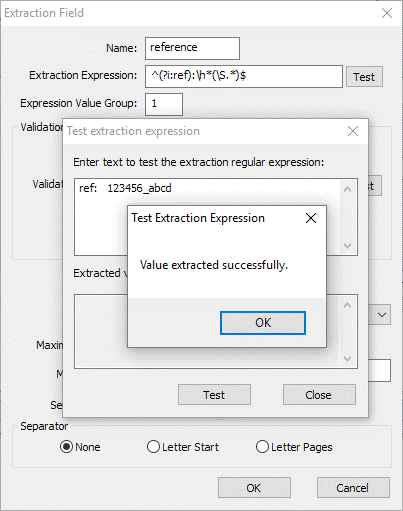
Fig 3.1
Not all fields use a validation expression but an extracted value can be tested against the validation expression in the same way as the previous example.
In this example [Figure 3.2] the long date “2 March 2017” has failed the validation expression because it is expecting slashes between the values, not spaces as per the data.
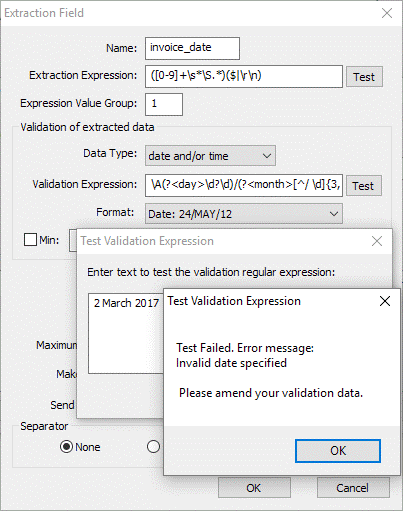
Fig 3.2
Letter Grouping
With EasyPost Mailroom 5 a new feature has been added to allow end users to determine what should happen with an extracted field when it is required that letters to the same recipient be grouped.
E.g. if two letters to the same recipient are printed to the mailroom but each letter has a different reference then by default the letters will not group due to differing extracted metadata. If however we decide to keep all references in a list then the letters can be grouped. See Figure 4.1 for the different values available when wishing to group letters. Any setting other than compare values (default) will result in letters grouping if the other extracted metadata matches.
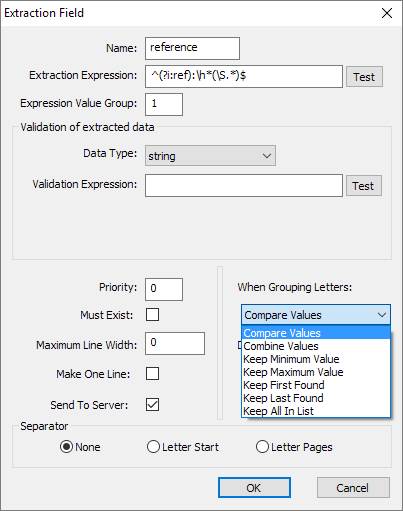
Fig 4.1
Preview Extracted Data
The data that is extracted from 1 or more zones is now viewable in the Mailroom preview screen in sortable columns. Clicking on the column heading will sort by that column. In Figure 5.1 the column “invoice_date” has been sorted.

Fig 5.1