It is recommended that your system administrator oversee the EasyPost setup, and/or any adjustments to its configuration.
To ensure that your future mailings are received and processed successfully it is advised that you notify bing Customer Service of any configuration changes made.
Mailroom Configuration Utility
EasyPost Mailroom includes a configuration utility to assist with advanced enterprise configurations. The MailroomConfig utility is located in the EasyPost Mailroom installation directory.
Administrators can create multiple configurations which can then be used to process mailings on different accounts, or with different configuration requirements. A desktop shortcut to this program can be created to allow users to switch between pre-set configurations.
Note. All instances of the Mailroom including Watch mode must be closed to run the Mailroom Configuration Utility.
Important: Only users with Administrator rights can create new configs. Normal users may switch between configs or amend the current.
Fig 1.1
Fig 1.2
Below is a list of fields which can be configured by the Mailroom Configuration Utility.
- Customer ID*
- Drop Location*
- Encryption Key ID*
- Encryption Key Value*
- Database Location
- Shared Database check box
- Department List
- Regular Delivery options
- Shared User Settings
- Enabling Purchase order Mailroom input
- Enable Legacy Spacing
- Debug Preview
- Server URL/Secondary Server URL
- Allow Unsecure Connection
*These values pertain to, and can be retrieved from the EasyPost Spooler – see the Get Config section below.
Customer ID
The Customer ID is provided by customer service upon successful creation of your account. It is entered here only when using a spooler-based configuration (see also the Get Config section below). When using a stand-alone configuration it is entered in the Mailroom registration dialogue box.
Drop Location
The drop location is the folder where encrypted mailings are dropped for transmission to our servers. It is here only when using a spooler-based configuration (see also Get Config section below). The drop location should match the location specified in the Easypost Spooler configuration.
For example: \\servername\received
Encryption Key Id
Specify the public key ID to be used for encryption. Required only when using a spooler-based configuration. (see also Get Config section below)
Encryption Key Value
Specify the public key to be used for encryption. Required only when using a spooler-based configuration. (see also Get Config section below)
Database Location
Specify the database server connection parameters.
Format: host[:port]\[db] where:
-Host is the name or IP address of the computer where the database service is running.
-port is optional port number, the default value is 45666.
-DB is optional name used to connect to a database different from the default one. It is used as a relative folder path under the root database folder where the database files are stored and should be valid (sub)folder path.
Leave blank to use the service locally – database(s) are stored by default in %programdata%\EasyPost\DB.
Remote host example: servername\
Shared Database
When enabled, all users will use a common database (located in the db.root folder of the database location).
Department List
Used to specify the list of departments that will be displayed as a dropdown list. The first character of the string is used to specify a separator.
For example, strings "/Sales/Accounting/Technical" and ";Sales;Accounting;Technical" would both be valid lists containing three departments. Where a string is entered for the department list the edit boxes used for free form entry of departments are read-only.
For example:
/QLD/NSW/VIC
;CT3746-A;CT3746-B;CT3746-C/D (semicolon is the first delimiter encountered, so the backslash is treated as part of the department name).
If the second character of this string is a colon (":" – eg “P:\bing\departments.txt) or the first two characters are backslashes ("\\" – e.g. \\server\share\departments.txt), the string will be interpreted as a file name. The list of departments will be loaded from the specified file.
The first line in the file will be treated as a header and is ignored. The first column will be used as the department code and a tab-delimited second column may be used as a description (the description will be shown in the selection list but will not be included on customer invoices).
NB Don’t include opening parentheses "(" in your department codes as all text after opening parentheses is ignored.
Priority Delivery drop-down
Allows selection of Australia Post delivery speed.
Disabled – default
Enabled - users can specify Priority or Regular (slower) delivery in the Mailroom, by mailing, or in presets.
Always use Priority – forces all mail to Priority. Users cannot change in the Mailroom, or presets.
Always use Regular – forces all mail to Regular. Users cannot change in the Mailroom, or in presets.
Pre-configured drop-down list
Use the dropdown to select a previously created configuration or create a new configuration.
Save - Will save all changes to the current configuration.
Activate - Will make the selected configuration (in the Dropdown) the one which will be used by the mailroom when it is next run.
Advanced
Shared User Settings
Used to specify how to share user-specific Mailroom database information.
Not Shared (default)
Shared between all computers and users – all presets and their settings are globally shared (NB this includes recipient email address and Mailroom registration if required).
Shared between users on each computer - all presets and their settings are shared by a single userid, regardless of machine
Shared between computers for each user - all presets and their settings are shared on a single machine, regardless of user
Purchase Orders Enabled
Enables Purchase Order entry in the Mailroom UI. See Purchase Orders for more information.
Legacy Spacing
Used to deal with documents containing break characters like spaces, tabs & line breaks in the document background, which can break word separation in extracted Mailroom data (most commonly addresses). When set, fragments of text containing non-text values such as these are discarded.
Debug Preview
Enables a specific page preview mode, which can be used to identify document content not compatible with digital printing (e.g. image transparency, opacity in layering) known as raster operations (aka ROps).
Server Base URL/Secondary Server URL
www.easymail.com - should not be altered unless specifically instructed by Bing Customer Service.
Allow Unsecure Connection / Force Unsecure Connection
Allows unsecure server communication. When forced, all server requests are always transferred over an insecure connection. NB Some sensitive data may be transferred in plain text.
Get Config
This button is used for spooler-based configurations only. NB The spooler must already be registered and configured before use – Customer ID, encryption key & ID and drop location are all retrieved.
The spooler service must be running, and be configured to listen for a Get Config request. To enable this, run the spooler GUI (Start>Programs>EasyPost>Spooler on the installed machine). Under the General tab, ensure the service is started. Under the Client Settings tab, check to Enable Client Settings Update Listener and enter either port 45600 or 45601.
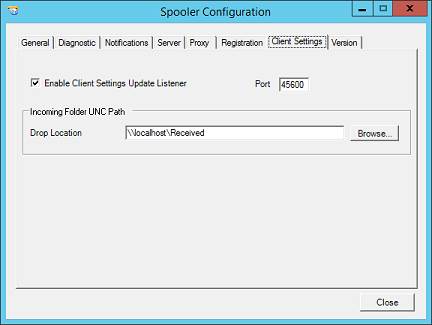
Fig 1.3
To retrieve spooler settings for the config, click Get Config.
Fig 1.4
Enter the host name (this is the name of the machine where the spooler is installed) and the port you configured to listen on. Customer ID, Drop Location (see also Incoming folder in the Spooler General tab), encryption key ID and value should all be populated from Spooler settings.
SMTP Configuration
Configure SMTP settings so that errors and warnings that would otherwise just go to the event and mailroom logs, also get sent via email.
Click SMTP Config.
Fig 1.5
SMTP Paramaters
Complete the SMTP Server Name, connection parameters and Authentication as required.
E-mail addresses
Enter a valid From address, and the e-mail addresses to receive Silent Send errors and Watch Mode notifications.
Click Test to send a message.
Contact your systems or e-mail administrator if the configured recipients do not receive your test messages.